Angular and Firebase — The Perfect Pair: Part 2

Just in case you missed the first part you can read it here. In this article, we’re going to cover getting set up with the Firebase CLI and then we’re going to get into the Firestore rules. I mentioned them a little in the last article and if you’ve read the documentation you should be all caught up.
The Firebase CLI

One of the best things about Firebase is it’s CLI. It’s easy to use and very straight forward. You can read more extensive documentation on the CLI here but I will go through a very basic setup.
In order to install the CLI, you have to have NodeJS and NPM set up on your system. I won’t go over installing that, but a quick Google search will yield all the information you will need to get that working.
With NodeJS and NPM installed we’re going to install the CLI by typingnpm install -g firebase-tools into the terminal. Once that is installed you should be able to run the firebase command and get the help page.
Once you can get the Firebase command working you’re ready to link your account. Enter firebase login in your terminal and you’ll get a Google O-Auth screen where you can log into your account. One thing to make sure of is that you’re logging into the same Google account you created the project with otherwise, it isn’t going to work. If you realize that you’ve logged into the wrong account simply type firebase logout and you can do it again.
Once you’re logged in, navigate to the directory where you want to start your project and type firebase init and you will get this screen:
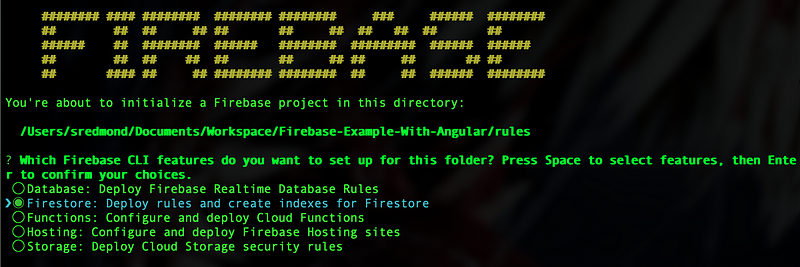
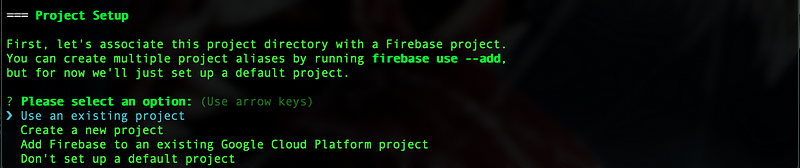
Use the up and down arrows to select Firestore and press the space bar to select it. Once you’ve done that hit the enter or return key. Next, you’re going to select the option to use an existing project.
Once you have done that it will show you a list of existing projects (I have blanked out all but the one I’ve already created) that you can scroll through.
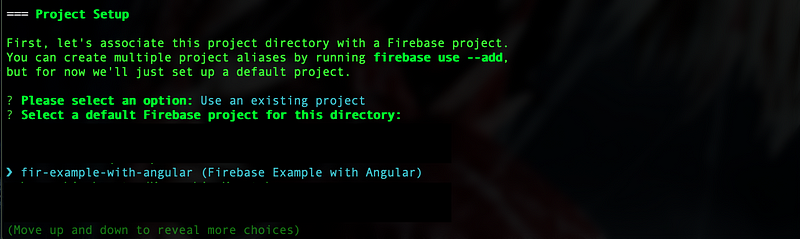
Once you’ve selected the correct project you can basically just hit enter to the end and keep all the default.
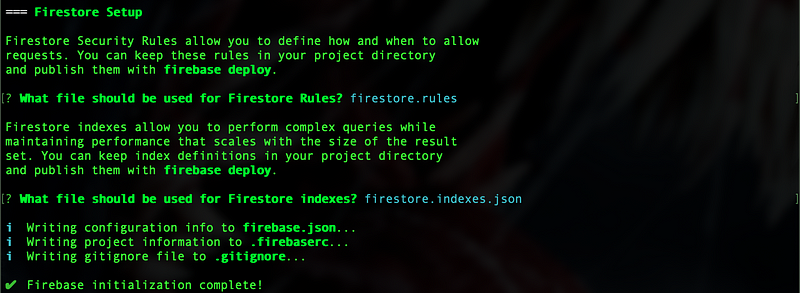
Now we’ve initialized our rules and, if you’ve noticed, we also have some index rules. I will talk about index rules a little later, but if you’re curious about it now you can read the documentation here.
Firestore Rules
Before we create our rules, let me tell you a little bit about Firestore Rules. These are basically if statements that will run before any query to Firestore can complete. The Rules are probably one of the best features of Firestore and the Real-Time Database. Firestore Rules make sure that no one can access any data that they aren’t supposed to. We’ll be able to see the full power of rules in action once we start to create some rules.
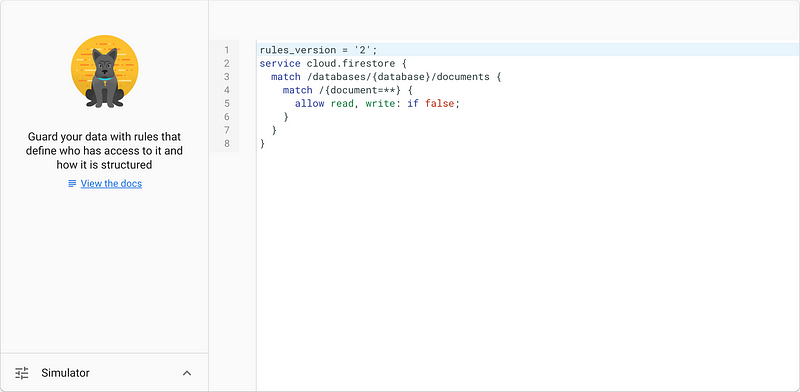
Let’s open up our Rules in our IDE, I like Visual Studio Code but you can use any IDE you want. You’ll notice that the rules we have initialized look exactly like the rules in our Firebase Dashboard.
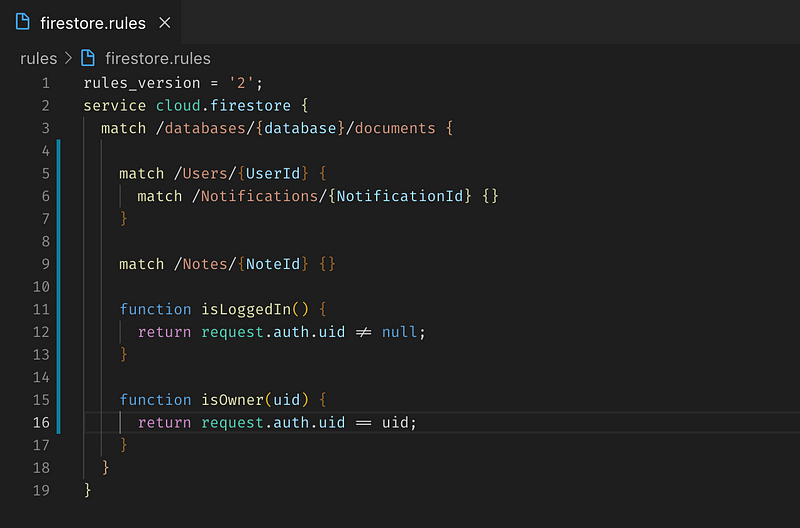
Before we create the rules we will need some kind of data design in mind. Right away I know we’re going to need a collection for Users and a collection for Notes.
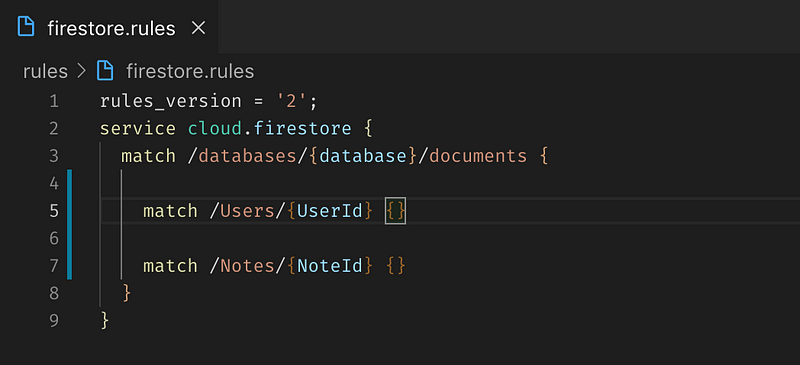
If you see the {UserId} and {NoteId} these are placeholders for the actual ID of the document. We will be able to use that later to firm up our security rules. Now Firestore has a concept of sub-collections, which I’ll give you an example of using Notifications.
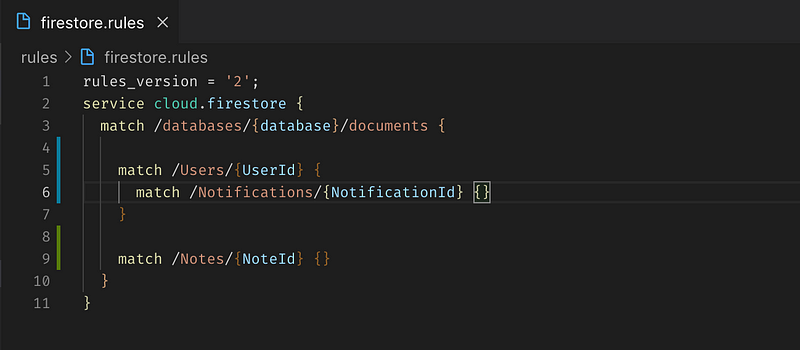
The full path to the notification will be /Users/{UserId}/Notifications/{NotificationId} and that means that each user will have a sub-collection of notifications associated only with that user.
At this point, you may be curious as to why I don’t do that with the Notes collection. The reason being is that keeping the Notes as it’s own parent collection ensures flexibility. For example, if I wanted to build in a note sharing feature that would be more difficult to accomplish if the Notes were a sub-collection of each user. I will note that the Firestore team has come up with a way to handle queries across multiple sub-collections called a Collection Group Query, but I won’t be covering that here. If you’re interested in it you can read a great post about it here. To keep things simple, we’re just going to keep the Notes as it’s own parent collection.
Securing the Data
Now we need to actually secure the data somehow. In Firestore you can check against a read, update, list, delete, or update operation. There is also a write operation which covers multiple scenarios. You can check out the docs on how these can be more granular here.
Firestore rules also allow us to create some custom functions which will come in handy. Let’s create a couple that we will be able to use later.
Firestore rules give us access to the request coming in so we can grab some information off of the request like the user’s id. I want to be very clear about this that the uid in the request is the uid generated by Firebase Auth NOT by Firestore. I will talk more about that when we get into creating the Angular app, but that’s all you need to know right now. If you need any further clarification, Firebase has excellent documentation, and you can feel free to ask me.
In order to secure our data we also kind of have to have some kind of object structure for our data in mind. Every document will have and Id field that will be an automatically generated string given to us by Firestore. We will be able to use that with the placeholders I mentioned earlier. We’re going to go ahead and say that each note will have an Author property that will be the Firebase Auth uid of the user who created the document.
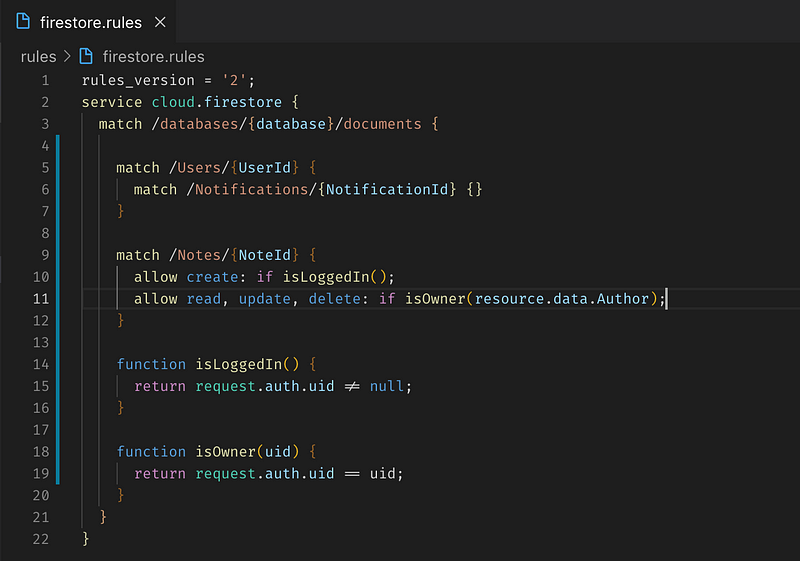
Just as we are able to access the request we can also get the resource data of document in question. This allows us to figure out who the owner is and make sure that only that person can read, update, or delete that document. Furthermore, we can make sure that only authenticated users can create a Note. Let’s finish up our rules:
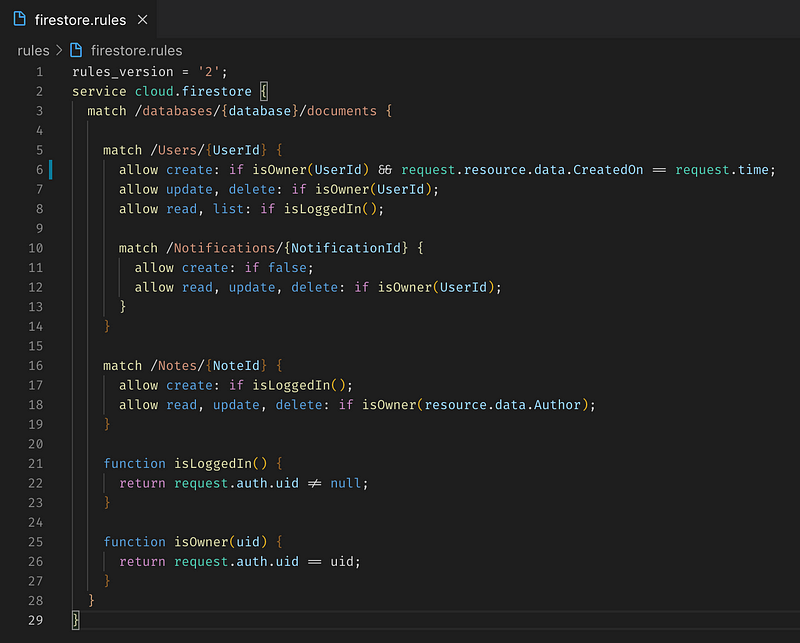
These will do for our initial set of rules, but we’ll probably end up amending them later on. What I’ve done is made sure that anyone can create a user, provided they are the owner and the CreatedOn attribute matches the request time (this helps ensure that people can only create a single account), only logged in users can read and list other users, no one can create a notification, only the owner of the notification can read, update, or delete the document. There is one important thing I’ll point your attention to, that is the fact that we can use the UserId placeholder for sub-collection just as we can for the parent collection. I’ll also point out that it is usually good practice to have the Firebase document Id match the Firebase Auth Id. This makes authentication MUCH easier when it comes to the rules as you’ll see later on.
Deploy your Rules
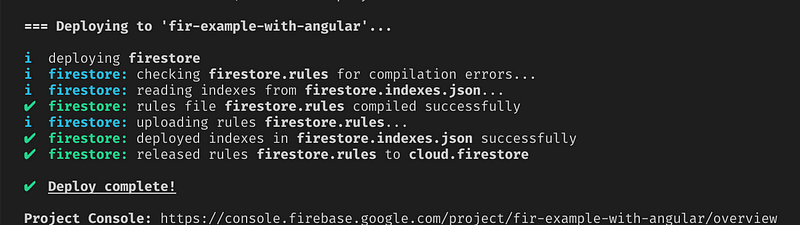
Deploying your rules is a super easy single command: firebase deploy and you will get the above screen. Now you can go to the Firebase dashboard to check the deployment of your rules.
You should be able to verify that your rules have been successfully deployed. You will also notice that Firebase keeps track of your rules deployments for you. At any time you can rollback to a previous set of rules without even having to touch your code. This is a really powerful and well thought out feature by the Firebase team.
Testing your Rules
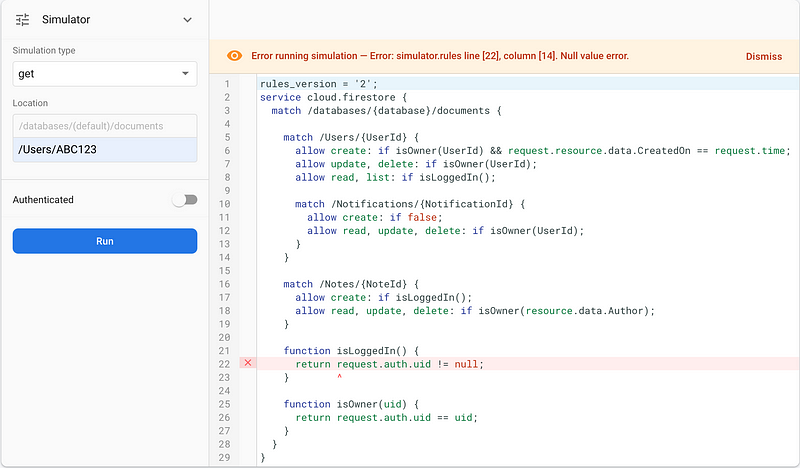
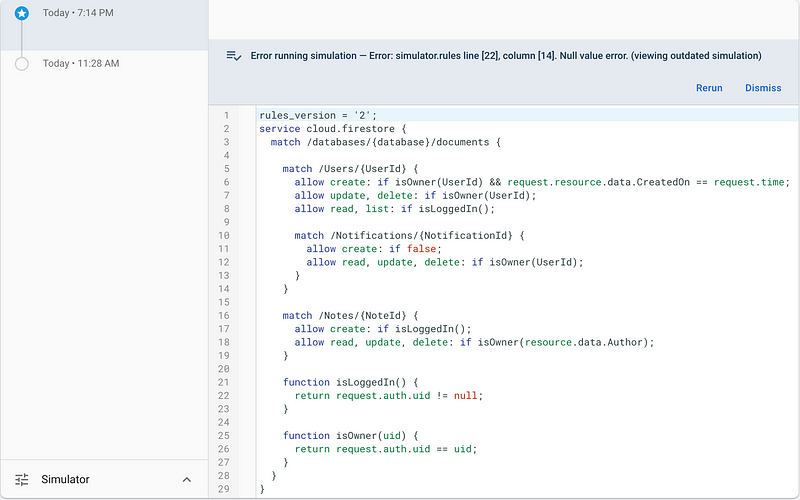
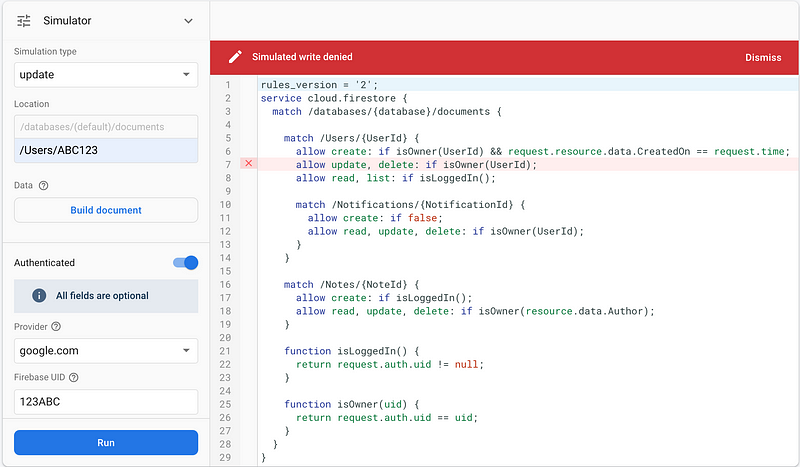
You can also verify that your rules will actually with using the simulator. This is yet another incredibly useful and intuitive tool to use. You can define a path to an imaginary document or collection and then simulate an action against it. It will show you exactly what has failed or passed.
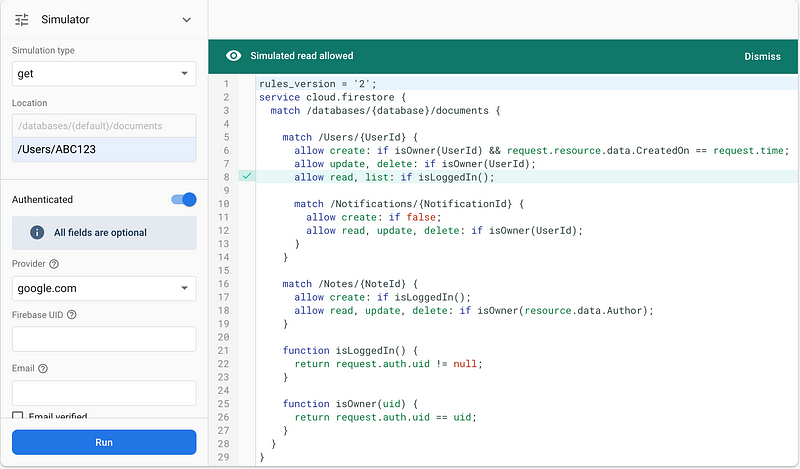
Here is another example:
I know what you’re wondering, can I automate this? I’m happy to say that you absolutely can! I won’t get into details about Firestore rules test automation here, but you can check out the Firebase example repo here.
What’s Next
In this article, we created Firestore rules. If you want to review the rules I’ve created I have a repo on GitHub here. In the next article we’re going to talk about getting the front-end setup. We’ll go through how to get Firestore and Firebase Auth working.
Read part 3 here.
If you’ve enjoyed this article I’d love for you to join my mailing list where I send out additional tips & tricks!
If you found this article helpful, interesting, or entertaining buy me a coffee to help me continue to put out content!