
Why We Should Throw Out React and Pick Up Angular

Ok, so I wrote a bit about why I think we should stop using React. To summarize the article a bit, there were several main issues I had with React:
- It’s mostly hype that drives its popularity.
- It gives you too much freedom, which leads you to make some really basic mistakes early on that sabotage you’re app later.
- It’s a memory hog and not tree-shakable.
- Your React app becomes exponentially more complex the larger it gets making it a hassle to maintain.
- There’s nothing built into it (like form handling) so you have to write a lot of complex code to make up for it or install a bunch of 3rd party dependencies.
- Upgrading your application to the latest version often requires a full rewrite.
These are the largest issues I have faced personally when dealing with a variety of React projects. In this article, I want to share with you how Angular solves most of these issues and enables you to focus on what you’re building rather than how you’re building it.
All aboard the hype train
Angular gets a fair amount of hype as well, so I can’t really say that Angular “solves” this particular issue. For one thing, I don’t think Angular gets the same amount of hype that React does. I think that mainly has to do with how Google branded it. First, there was Angular JS which was a giant steaming pile of garbage. I will give credit to Google because they decided to overhaul Angular JS and turn it into Angular (or Angular 2) which is a massive improvement. I think that the improvement came at a cost to its popularity though.
Personally, I think they should have rebranded Angular as something else because Angular JS and Angular are nothing alike. Literally, the only similarities are in the name and the company producing them.
In my opinion, I do think that Angular deserves the hype it does get. I think the Angular devs have created an incredibly well-thought-out framework that both performs well and is fairly easy to use. I’ll talk more about the advantages of using Angular in this article and maybe by the end you’ll agree with me on the deservedness of Angular’s hype.
You get exactly what you need
One of the big differences between Angular and React is the fact that Angular is a fully-fledged framework as opposed to just a library. As I discussed in the previous article, React tries to have the best of both the library and framework world and kind of does both poorly. In contrast, Angular doesn’t try to be a library it goes all-in on being a framework and does it really well.
With a basic installation of Angular, you get pretty much everything you need in order to build whatever app you want without having to install any third-party libraries (I already know what you’re thinking and we’ll get there). With Angular, you get a robust framework that enables you rather than holds you back. You don’t have to spend a bunch of time writing a bunch of complex code to do things like form handling or validation because that’s all handled in the framework.
Furthermore, you get things like the Angular CLI which is one of the most powerful tools in Angular’s belt.

One of my biggest issues with React is the lack of standards. If you learn one React application you’ve learned one React application because they’re all completely different. On the other hand, If you learn one Angular application you’ve learned every Angular application and the Angular CLI is a primary driver behind that.
Unlike React there is a right and wrong way to do things in Angular. Using the CLI usually ensures that you’re always going to be doing things the right way. Let’s take it from the top. We want to create a new application, so how does that work?
ng new my-app
Yep, that’s it. Run this command the CLI is going to set up a bunch of stuff for you. It will even give you some options for things like linting. style system, and routing that you can choose before your app is created. So here’s what’s going to happen:
- It will create a directory called my-app and initialize an Angular application in it and install dependencies for you.
- Scaffold your new application giving you everything you need to run your app as soon as it’s finished.
- Along with scaffolding, you’re also going to get a baseline end-to-end testing implementation with protractor packed right in that you can add to as your application goes along.
- Angular gives you an easy-to-use config file (angular.json) where you can easily customize how Angular builds your application, even how it’s done by the environment.
- Speaking of environments Angular also has, packed within it an easy to manage and typed environment management system.
There’s a lot more you get that I’ll probably touch on but already this is a lot of stuff you get straight out of the box that you just don’t get with React. So what else does the CLI give you?

Besides creating and scaffolding your entire application it will also manage your application for you. Let’s say now that you have a shiny new application you want to create a component.
ng generate component my-component OR ng g c my-component
There are 2 ways you can generate a component and they’re basically long-hand vs short-hand commands which is kind of nice. This also does a few things:
- Create a directory called my-component and puts a blank slate component in it.
- Automatically generates unit tests for that component.
- Automatically scaffolds that component into your application’s structure.
The Angular Way
So I mentioned a right and wrong way to do things and I also mentioned a few things that happen around scaffolding, but what does that look like? Without making this an Angular how-to I’ll briefly go over high-level concepts. I’ll use some examples you can find on stackblitz: https://stackblitz.com/edit/angular-examples-modules
We’ll set up a super simple example app. In every Angular app, there are the base app files. Then we’re going to want a custom button component. We’ll use the Angular CLI and run 2 commands:
ng g m button
ng g c button
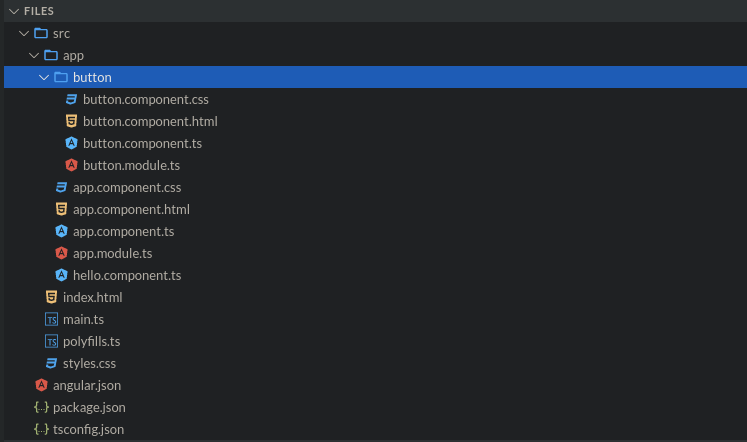
In this example, we have a folder called button. In that folder, there is a button module, button component, button test file, button style sheet, and button HTML file.
A quick note, Stackblitz does not generate .spec, or test, files. In your local editor, a button.component.spec.ts file will be created for you with a basic “does it render” test and you can add tests as you go along.
This was all auto-generated by the Angular CLI. If you notice the order of the commands is very specific and that’s for a reason. First, we will need a module to contain our button component. Then we create the component called button and the CLI will automatically import your new component into the module. Then we’ll export our button component so that we can use it in another module in our application.
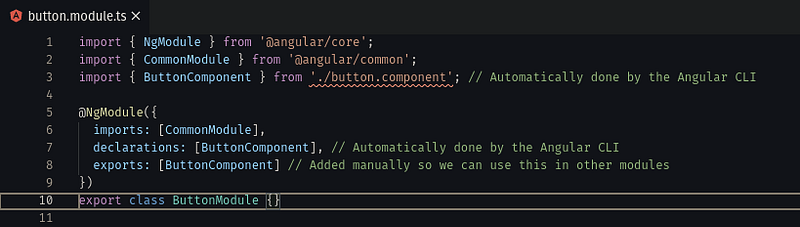
To keep it simple let’s just import this into app.module.ts. What we’re going to do is import the ButtonModule in app.module.ts and then include ButtonModule in the imports of the @NgModule decorator of AppModule.
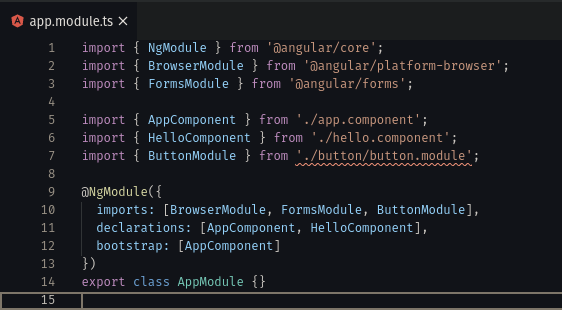
That’s it, now we can use the tag <app-button></app-button> in our app.component.html file.

This is the most simple implementation of using modules in Angular and there is more you can do with it, but the basic implementation we went over here pretty much stays the same no matter how you’re using it so even if your use case is more nuanced it doesn’t make your life more complicated.
Get me from point A to B
I want to touch on one more thing that Angular gives you right out of the box and that’s routing and lazy-loading. I won’t go too in-depth here but I just wanted to give you a little preview. If you want the full experience you’ll just have to go use Angular yourself ;).
Like any good CLI, Angular’s has options you can use. One of which enables routing when scaffolding your application.
ng new my-app --routing
Nowadays, you can just pick it from options without having to specify the flag, but the flag is there if you prefer it. What happens when you choose routing is that Angular creates a routing file for you. This will serve as your main routing configuration. Then when you create modules for your pages you can also specify the routing flag. This will then create a routing config for that module.
When you have a module with a routing file, you can easily lazy load that module in your main routing config:
const routes: Routes = [
    {
    path: 'main',
    loadChildren: () =>    import('src/app/routes/main/main.module').then((mod) => mod.MainModule)
    },
];
When you specify loadChildren you can use async import syntax for the module you want to lazy-load. This means that when your app loads the client doesn’t have to download the code for the main route or any third-party dependencies or anything that the main route might use until the user wants to load that. This keeps your initial load nice and slim and ensures that the user isn’t downloading the WHOLE application all at once. What’s more, this is given to you out of the box and all you have to do is use a little flag when creating your app and modules.
Reusability makes your life easy
So we’ve gone over how Angular uses Modules to organize your app pages and components and I want to expand on that a little bit. You’ve probably realized by now that Angular uses TypeScript as opposed to plain JavaScript. This is a distinct advantage that Angular makes full use of.
I know you’re going to say “well React can use TypeScript as well” and that’s true but they don’t make full use of TypeScript. A type system is only part of what makes TypeScript great, the other part is that you get to take full advantage of things like Classes and Decorators. React has made it very clear that they’re moving towards functional components as opposed to class-based components which really takes away half the power of TypeScript. It’s now harder for me to re-use functionality throughout my application easily and that makes it a lot harder for me to develop my application in a way that lends itself towards maintainability.
In Angular, I can create a decorator that hooks into lifecycle methods to perform a standard set of actions and all I have to do is include my decorator at the top of my class.
@my-decorator()
export class MyClass {}
That makes my code more readable and maintainable in the long run as I add more functionality to what I’m building.
Tree shake your applications
Before I get into this section, I’d like to shout out Victor Savkin for this excellent article because I’m going to be pulling some of the knowledge about Angular Ivy from it.
[embed]https://blog.nrwl.io/understanding-angular-ivy-incremental-dom-and-virtual-dom-243be844bf36[/embed]
In the previous article, I talked a little bit about how the virtual DOM is kind of a memory hog and you can’t tree shake it so you have to ship the whole thing every time. Well, Angular flipped the game with Angular Ivy. You can read all about how Ivy works in depth in Victor’s article (10/10 would recommend btw) I’m just going to give you the parts that relate to this article.
Angular Ivy uses something called incremental DOM. The key idea is that each component references a set of instructions that are known at compile time so if a certain set of instructions are not used they can be excluded from the build.
Unlike the virtual DOM, when changes happen the incremental DOM does not require any memory to re-render DOM trees if nothing has changed. Furthermore, memory allocations for changes are proportional to the size of the change. These things all go together to help Angular run more efficiently, especially on mobile devices.
Remember when I said “I already know what you’re thinking and we’ll get there” earlier. Well, here we are. At that point in the article, I’m sure you were thinking to yourself “well what if I don’t need EVERYTHING that Angular gives me”. Well, you read it for yourself if you don’t use part of what Angular gives you it gets tree shaken right the heck out! Their tree shaking and build optimization is getting better all the time and will result in slimmer builds, especially if you’re not using absolutely everything that comes in Angular core.
Upgrading is easy as pie

If you’re reading this, more than likely you’ve worked as a software developer of some kind. I’m sure I don’t have to convey to you the absolute pain and misery of trying to get onto the next version of a library/dependency. Updates are a necessary part of life and with Angular, they don’t have to be pain points.
I’ve been working with Angular for a long time and I’ve seen all the updates since the initial release (I’ve even used Angular JS, but I prefer not to talk about that). Angular has certainly come a long way and so has the CLI. Around 2018 (I think) the Angular CLI got another command called ng update. You would use it like this:
ng update @angular/core
Then the magic happens. All the core Angular dependencies get updated to the latest version. If your code needs to be updated the CLI will update your code for you where it can, and tell you where you need to manually update it if it can’t. Getting onto the newest version of Angular takes seconds to minutes as opposed to hours or days (sometimes weeks) like it does with React.
This is in part the help of the Angular CLI as well as how the Angular team releases updates. The Angular team takes care not to release a bunch of breaking changes that will force developers to completely rewrite their applications. They make sure that if they do release breaking changes that there is always backward compatibility for a version or two to allow developers time to make larger changes if necessary. This is something I use constantly and it’s been a complete breeze maintaining Angular applications since.
Let’s tie it all together
Alright, we talked about a great many things in this article, yet I feel like there’s so much more I wanted to say. However, I think that I’ve tackled all the pain points I mentioned at the start.
Doing things the Angular way and making use of the Angular CLI gives you a great deal of consistency in your applications. While some applications may vary in the way they’re set up the principles will always be the same so getting on board with a new Angular project will be a complete breeze. Learn it once, apply it everywhere.
That same consistency also gives you maintainability. As your project grows in size it doesn’t become exponentially harder to maintain. This is probably one of the biggest issues I have with React and Angular solves it perfectly. Going along that same train of thought, we also get everything we could possibly want built right into Angular core. Form handling? Check. Routing? Check. Lazy-lading? Double-check. I could go on but I’ll keep it short. Even better, if you’re not using something Angular core gives you that gets thrown right out of your build because everything packed into Angular core is tree shakable INCLUDING the renderer.
To wrap it up, I’ll just say this. Go try Angular. Watch a YouTube video, read the docs, or however you learn best. Then unceremoniously toss React in the garbage because you’ll never need it again.
If you’re a large company with a bunch of front-end applications and you’re forcing your developers to use React reconsider. If you want a group of developers who can seamlessly jump between projects, develop new applications and add features at break-neck speeds, and have a set of easily maintained front-end projects get on the Angular train. If you’re that business then React is just holding you back.
If you’ve enjoyed this article I’d love for you to join my mailing list where I send out additional tips & tricks!
If you found this article helpful, interesting, or entertaining buy me a coffee to help me continue to put out content!
More content at plainenglish.io