
Angular for Beginners: Understanding Angular

Many people think of Angular as a difficult framework to learn. I hope to dispel this notion and prove that Angular is just as easy to get started with as React, Vue, or Svelte. In this Angular for Beginners guide, we will create a new project and dig into how the Angular framework works. I tried to make this guide for everyone, whether you’re an experienced developer thinking about getting into Angular or a brand new developer looking to start your development journey.
The CLI
Let me introduce you to your new best friend! I’ve said it before, and I’ll say it again, the Angular CLI is your greatest asset. This is the first thing you will need to install on your system (besides Node and NPM). It’s pretty straightforward; all it takes is a simple command.
npm i -g @angular/cli
That’s it! Now Angular is installed on your system, and you can start creating Angular projects. Let’s start a new project! First, change directory to where you want to create the project. From there, it’s another simple command.
ng new hello-angular
You can call your project whatever you want; I just called it hello-angular for this demo. Before the CLI generates the project, you’ll be asked a few questions. The first one is pretty simple.
? Would you like to add Angular routing? (y/N)
This option is just asking if you want to use Angular Routing. If you’re unfamiliar with web development, routing is how Single Page Applications (SPAs) go from one page to another. Each SPA does it a bit differently. It defaults to ‘No,’ but for this demo, we’re going to type y so that we can see how routing works.
The next thing it will ask you is to choose how you want to write your styles.
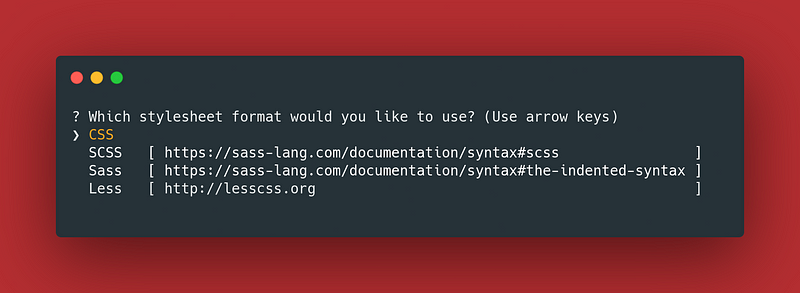
You can choose whatever you want. I prefer SCSS, but you can keep the default option if you’re new to web development. Once you make a selection and press the enter key, it will install the proper NPM packages, and that’s it! Now you can open the project in your favorite IDE. If you haven’t picked one yet, my favorite is VS Code.
Running the Project
Now that we have a project open in our IDE, we can run it. If you open package.json and look at the scripts section; you’ll see a few things are already there for you.
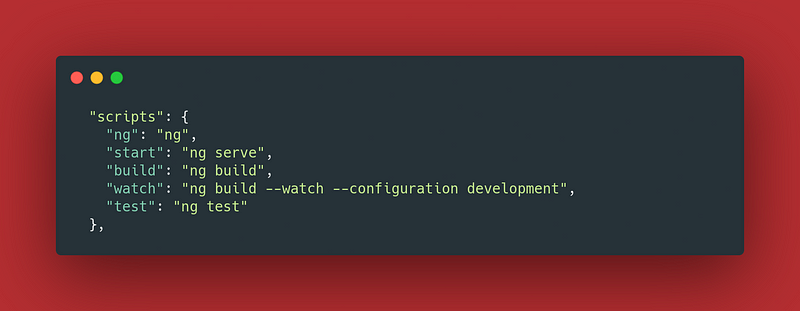
These are all commands we can run from the terminal. You can use the built-in terminal if you’re using VS Code, but you certainly don’t have to. Let’s give the start command a try.
npm run start
The project will take a second to start, but you should see the following once ready.
** Angular Live Development Server is listening on localhost:4200, open your browser on http://localhost:4200/ **
This means that your Angular project is now running on port 4200. So we can enter that address in your browser of choice. Once you do, you can see what the initial app looks like.
This is just some placeholder code that the Angular team put in for new projects.
Angular Project Structure
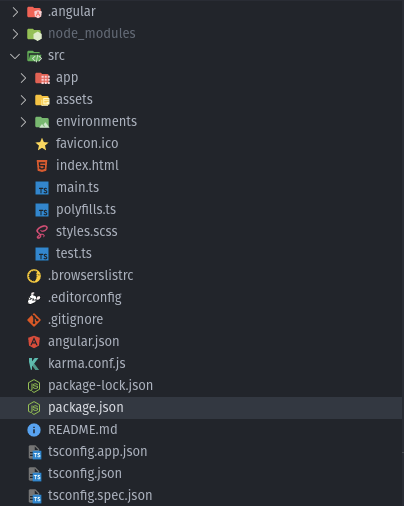
Since we always use the CLI to create Angular projects, all Angular projects will look the same from the start. Let’s dive into the project to see what each part is.
App Folder
The app folder is where all your code is going to live. Right now, we have only have a few things in here.
Angular is built on something called modules. You can think of modules like building blocks of an application. They contain a portion of the functionality of your application. For example, let’s imagine that we’re building an application that displays lists of things. Let’s say a todo list app. One module you might want is a todo item module. This module will be responsible for all the functionality of a todo item. It will have a checkbox, display some text, look a certain way, take in some data, etc. All you have to do is import your todo item module whenever you want to show a todo item. Let’s try and visualize how that might look.
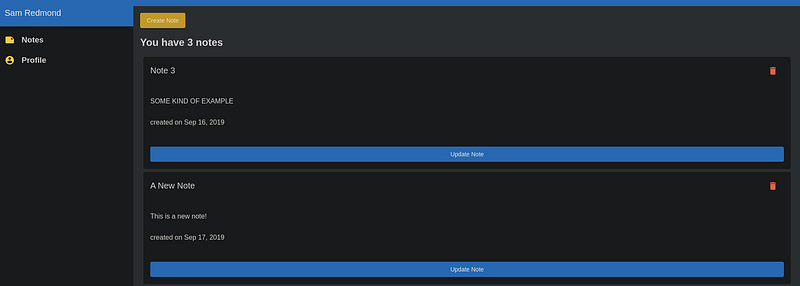
We’ve got a few parts to this application. We have the sidebar, a button to create todo items, and todo items. In the sidebar, we can identify a toolbar at the top with my name, and below that a list of navigation items. Similarly, there are smaller parts for each of the todo items. There is a title, a description, a date, a button to update it, and a button to delete it.
When talking about a module think of the todo item you see as its own module; similarly, the sidebar could be its own module as well. It’s up to you to decide how you want to break up your functionality. Hopefully, this little tangent was helpful in understanding what a module is.
Now that we know what a module is, how do we make one, and what do they look like? Fortunately, we can look at the app module.
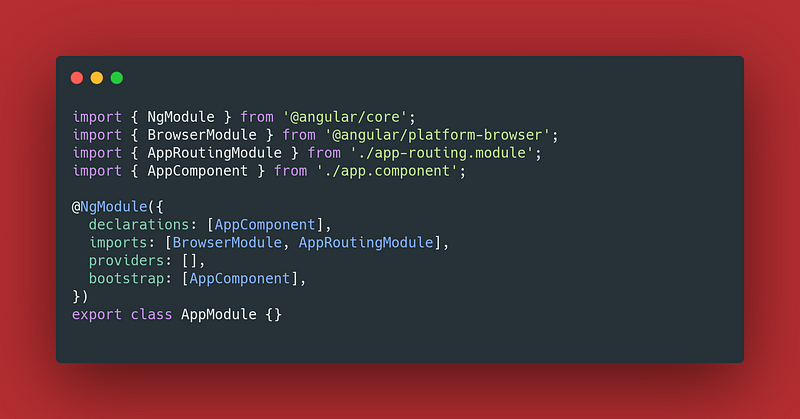
It is important to note that Angular is completely class based and uses TypeScript instead of plain JavaScript. This comes with several advantages that we’ll get into later. The app module is going to be the main module of your application. We can see the @NgModule decorator that sits on top of the AppModule class has a few configuration options inside it.
Before we get into that, what is a decorator? A decorator is a special kind of function that can be attached to classes, methods, accessors, properties, or parameters of a class. The functional will execute at runtime once your class is called. This is one of those advantages I was talking about. Decorators make it easy for your classes to share functionality. For example, let’s say you want to track the performance of some of your code and log some analytics. You can create a custom decorator and simply attach it to any class you want to track. This is an example of a custom decorator. Don’t worry about what the code means right now; this is just to show you what a custom decorator might look like.
https://gist.github.com/shadow1349/024e350a37b25d2eab1909c976989101
To use the decorator all you have to do is attach it to your class
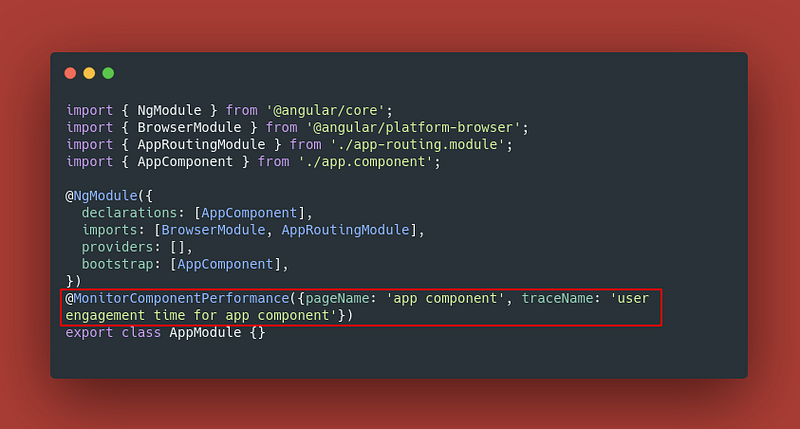
This makes it really easy to create functionality once and reuse it across your entire application.
Now that that tangent is out of the way, let’s actually talk about the @NgModule decorator. The first thing we notice is the declarations array. This array takes all of the components, directives, and pipes that make up a module. We’ll talk about those individual things later.
A pro-tip: if you’re using VSCode, you can install the Angular Language Service extension. Then you can hover your mouse over things, and it will show you what it does and what it means.

The next thing we notice are the imports. If you want to take functionality from one module and use it in another module, you need to import it to the imports array. You can see that we’re already doing that with AppRoutingModule. When we told Angular that we wanted to use its routing module, it automatically created a separate module. Then Angular automatically added the routing module to the imports array. We can do the same thing with virtually any module in our application. We will look at this in-depth a bit more later.
The next thing we’re going to look at in the list is the providers array. When we create a new application, we won’t have anything. The providers array is for things you want to inject into our components. These could be third-party dependencies, services we will make, or specific configuration options.
The last array we will talk about is specific to the app module. Yep, we’re talking about the bootstrap array. Angular is an SPA framework, so the whole application is served through a single bootstrapped component. To illustrate this, let’s look at the index.html file.
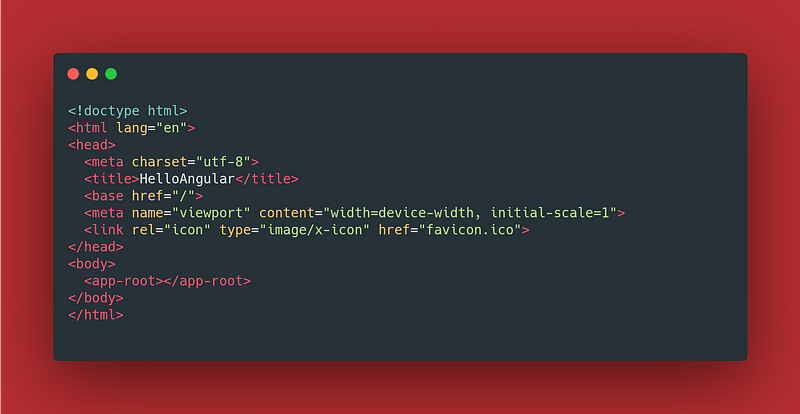
In this index file, app-root will be the app component. So it will render anything in app component into that HTML tag. We’re going to see how it all hooks up and how to create routes and pages later, but that will give you some good background information.
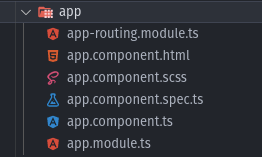
Now that we know a bit more about Angular and modules, let’s move on to the components. We can see that we have several files given to us. The first is the app-routing.module.ts. We’ve talked about this a little and we’ll get into it more later, but for now you have to know that it configures our routes.
The next file is app.component.html. This is the main HTML file. Open that up and you’ll see a whole lot of placeholder code. Angular uses HTML template files instead of going the route of Vue or React where you specify templates in JavaScript or TypeScript.
The following file is the app.component.scss, where our styles for a specific component live. When you add styles to a component they won’t bleed out into other components so they will always be constrained to the component you’re working with.
Now we’re at the app.component.spec.ts file. This is a file for unit testing your app component.
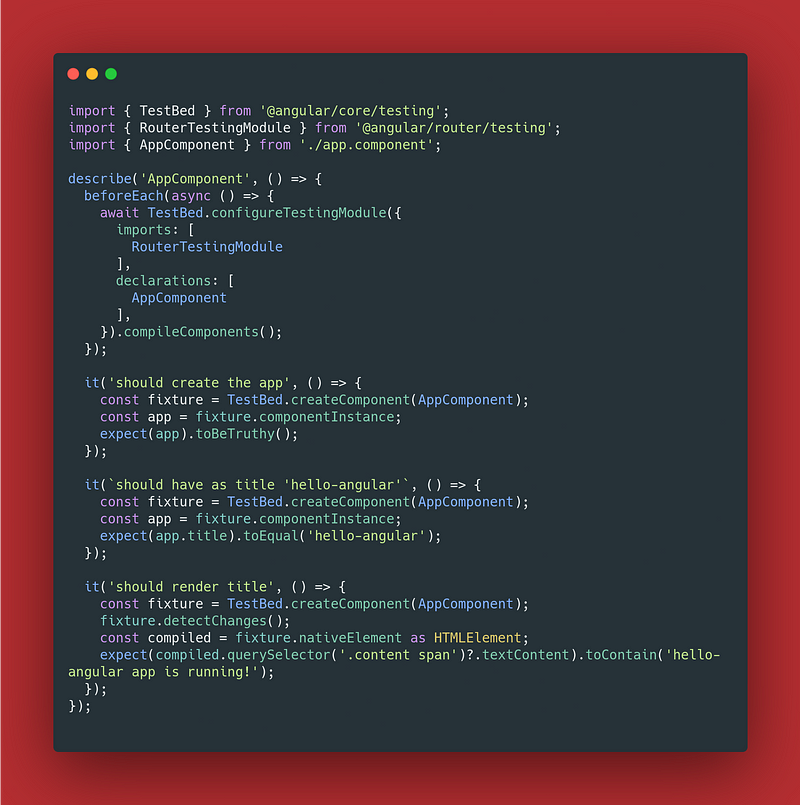
One of the great things about Angular is that we’re always going to have test files generated with all our components. When they’re generated, there will always be some very basic tests ready for us to add onto. If you like TDD, it is really easy to add your tests first. I wouldn’t recommend doing that because I think TDD sucks, but you do you. If you’ve worked on software projects before you may be worried that having all these test files automatically generated will give you some sort of false sense of security that you have written tests. Angular has you covered for that too.
If you run the command ng test --code-coverage you’ll get a report about the code coverage.
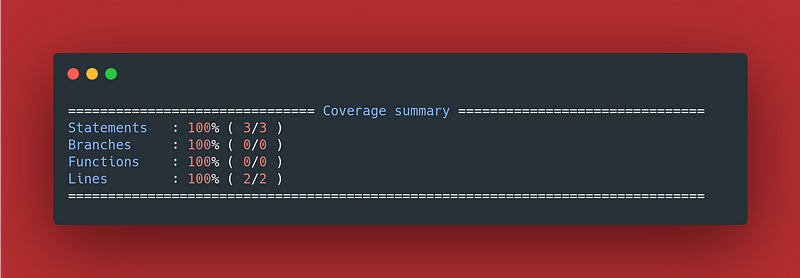
This report will tell you how much of your actual code is covered by your tests in four areas.
- Statements — these are control structures like if and for statements
- Branches — these refer to branches of if statements so if(something){} else{} are 2 branches. It will see how many branches we are testing
- Functions — these are simply functions that we have in our code.
- Lines — how many lines of our code are covered by tests.
With a fresh application, you should be unsurprised to learn that we have 100% test coverage because we don’t have any code yet.
As a note, if you’re on Linux and you get an error about not having a binary for Chrome, that’s an easy fix. Just install Chromium and then enter the following command then re-run the test.
export CHROME_BIN='usr/bin/chromium'
Lastly, we have the app.component.ts file. This file will contain all the logic for the component. We will be working with the component files a bit later.
Assets
We have a folder called assets with nothing but a .gitkeep file. All the .gitkeep file does is make sure that git does not forget about this folder. However, as the name suggests, the assets folder is where all of your assets will go. What is an asset? These can be any kinds of images or files you want to have in your application. Having a separate place that is designated for your application assets helps keep your actual code more organized.
Environments
If you expand the environments folder you’ll see two environment files, one for a dev/testing environment and one for your production environment. What do these do? These allow you to store any kinds of SDK/API keys or environment specific configurations. Angular gives you two environments by default but you can have any many as you want. Angular comes with environment switching baked into the framework. Let’s have a look at the environment.prod.ts file.
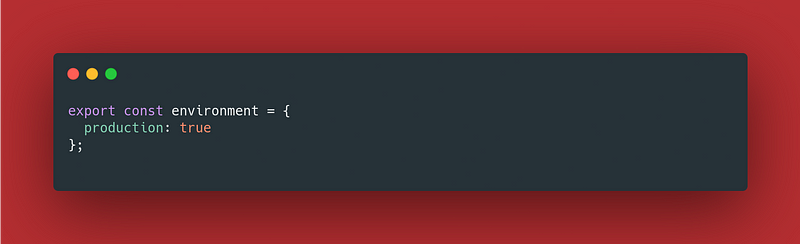
Right now, we only have a key that tells us if we’re in the prod environment or not. Let’s see how this can be used by looking at main.ts.
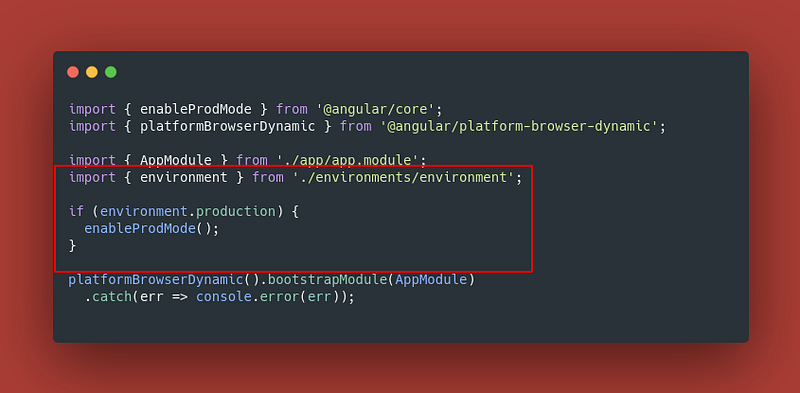
As you can see, we’re just importing a file called environment, not environment.prod. This may be confusing to look at because how does it ever switch environments? To answer that questions, we have to look at the angular.json file, which contains configurations for how we want to tell Angular to build our projects. We’ll talk about this more when it comes time to build our project but for now, scroll down until you see “fileReplacements” (you can also search for that phrase inside that file as well; there’s only one for a new project).

What happens is that when Angular creates a prod build, it will essentially replace environment.ts with our environment.prod.ts. This means that no matter how many environments we have, the file that contains the config for that environment will always be called environment.ts but have the specific config for the specified environment. This can be a lot to take in at first, but it’s given to you right out of the box, and it works well.
Let’s do some stuff
Now that we have a basic background understanding of how Angular is all put together let’s do some stuff.
Creating a new route
The first thing we’re going to do is make a new route. If you notice the routes are made of modules, we’re going to create a new module. To do this, we’re going to use the Angular CLI. There are two ways to enter commands: longhand and shorthand, and they do the exact same thing.
Longhand command:
ng generate module my-route
Shorthand command:
ng g m my-route --routing
This is going to create a brand new folder with a routing module and a normal Angular module. Now that we have a module for a new route, we need to create a component for the route.
Longhand command:
ng generate component my-route
Shorthand command:
ng g c my-route
Once you enter that command you’ll notice that a few things happened.

The Angular CLI created all the usual files, scss, HTML, spec, ts, but then it updated a file. Specifically, it updates the module we created in the last step. All this did was add the MyRouteComponent to the declarations of the accompanying module. How did it know to do that? That’s a good question. Whenever you create a component in the same directory as a module, the Angular CLI will automatically include that component in the module. You can test that by creating another component with a random name like this.
ng g c foo-bar
You’ll notice it does the same thing, except it adds that component to the declaration array in the app module. If Angular can’t find a module for your component, it goes into the app module.
Now we have everything we need to configure our first route. To do this, we will open up the app routing module and configure it like this.
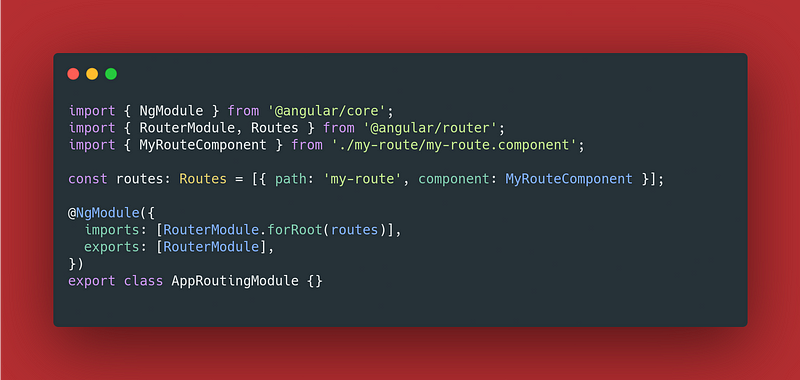
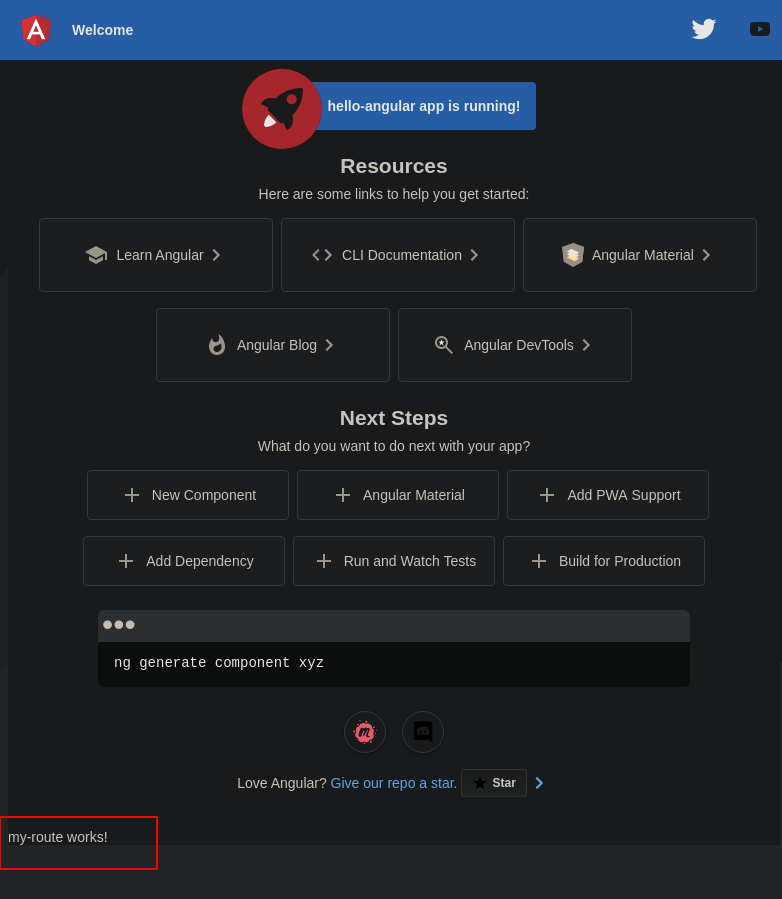
We’re going to put a new object in the routes array that has a path that we’re going to use in the URL and a component to serve. Now we can run the application and go to http://localhost:4200/my-route and it should work!
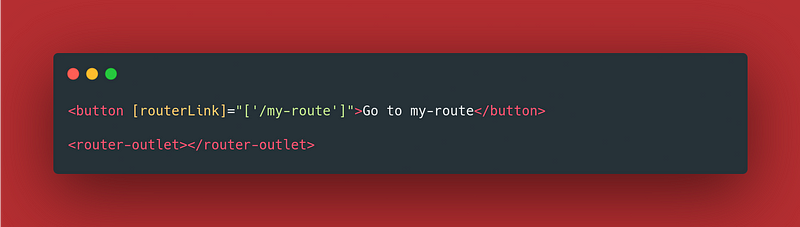
Now that we have a route configured, let’s break down how this works. If you open up app.component.html and scroll to the bottom, you’ll see the following HTML tag.
<router-outlet></router-outlet>
Router outlet is a unique Angular tag that replaces this tag with whatever is in your configured route. You’ll also notice that if we go to the main route, which is just http://localhost:4200 we still see all the placeholder code but the “my-route works!” is gone. That’s because anything outside of the router outlet will always display with the routes. Let’s say we wanted to have a main navigation bar; we can add the router outlet tag and have the navbar outside of it to always see the list of routes.
At this point, you may be wondering, what does the my-route-routing.module.ts file do? Right now, nothing. What we did above is basic routing. What happens with basic routing is that all the code is loaded at once by the browser. If you have a ton of routes, this can make the initial load of your app really slow. Fortunately, Angular comes with lazy-loading built right in, and that’s what the my-route-routing.module.ts is for. First, let’s remove all the placeholder code and add a navigation button in app.component.html.
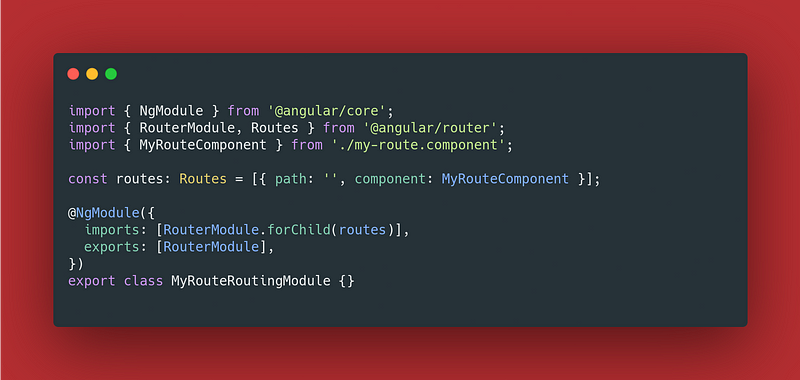
Then we’re going to go to my-route-routing.module.ts, and we’re going to add the component to that routes array.
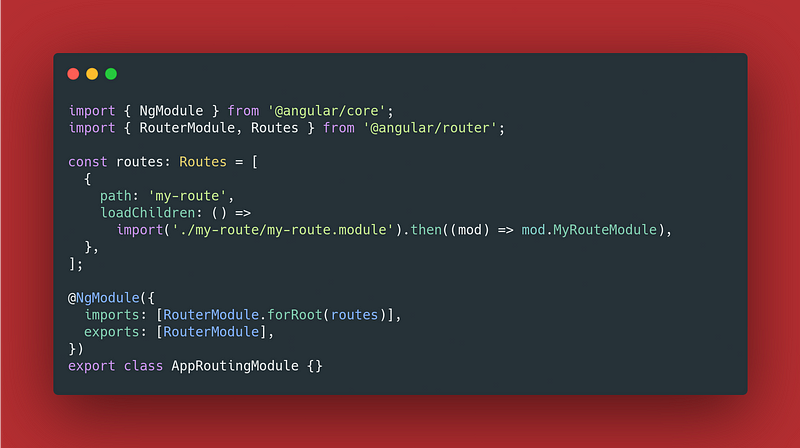
Lastly, we’re going to change how my-route works in the app-routing.module.ts.
Now we can re-run the app, and we can see that everything works!
So what happened here? We were on the initial route, and then we clicked the button and got to our route. However, something special also happened. When we went to that route, you can see that the browser loaded the my-route module after the initial app was loaded. Once your app gets larger, this will result in huge gains in initial load speed.
This is one of my favorite things about Angular because this comes out of the box and is extremely easy to set up. We’ve only had to enter a few commands and write a couple of lines of code (config, really).
So how does this actually work? If we look at app-routing.module.ts, we replaced the component key in the object with a loadChildren function. The loadChildren function will load the module asynchronously using the import syntax. This is why we can see the my-route module being loaded when it’s called. Then in the my-route-routing.module.ts, we needed to tell it which component to serve once it’s loaded. That’s about it! The sky is the limit with this. If you wanted to nest routes, that is also entirely possible and works the same way!
Services
Now that we’ve explored components, modules, and routes, we can dig into some services. What is a service? A service is a class that does something specific. This usually involves calling some back-end API. Angular differentiates services from components to increase the modularity of the application. For example, if we have a service that gathers the user’s IP address from an API, many components might want to use that. If we split that functionality into a service, it becomes re-usable and allows you to make your components more lean and efficient. Let’s make a service.
Longhand command:
ng generate service api
Shorthand command:
ng g s api
Unlike creating a component or module it does not go into it’s own directory. That can make the app folder kind of a mess, so I usually do this.
ng g s services/api/api
You’ll notice that giving it a path creates the files in a folder that we can specify to the CLI. This is really just personal preference and I do this to better organize my services into a folder called services.
You may notice that creating the service does not update the main app module. Let’s look at the service to see why that is.
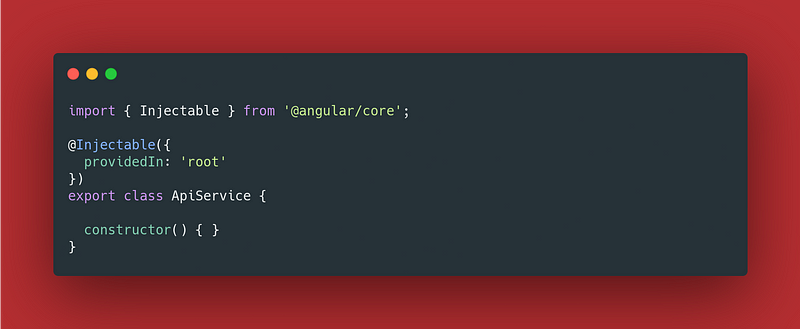
A service is given the @Injectable decorator. In that decorator we can see that we’re specifying a property called providedIn: 'root' which tells Angular to make this service global by default. At the time of writing this I’m using Angular 13. In previous versions of Angular, you used to include a service in the providers array of the app module to have it be served globally, but that was replaced with the new providedIn property. You can also specify that you want it providedIn a specific module as well, but that’s slightly out of scope for this article.
Let’s do something with this service. We’re going to use json IP to grab your current IP address. First, we need a way to make API calls. Fortunately, Angular gives us a way to make HTTP calls called the HttpClient.
We first have to add the HttpClientModule to the imports array in the app module.
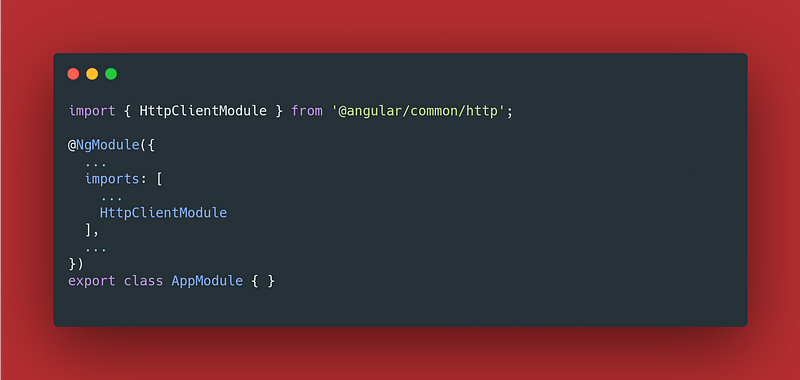
This will ensure that our application can inject the HttpClient into any of our services. So let’s use it!

That’s all the code it takes to call a GET method from an API. This is a very basic example, and there’s a little more to do once we get into API auth tokens which I may cover in another article. Let’s look a bit closer at what’s happening here.
Dependency Injection
The way we use the HttpClient in the constructor of the service class is called Dependency Injection (DI), and it’s a core concept of Angular. Using DI, we can request a dependency from an external source as opposed to creating a new one in the class. The Angular Framework’s DI makes all dependencies available upon instantiation of the class. The benefit of this is that our classes can be extremely clean, flexible, and modular (maybe you’re sensing a theme here).
Observables and RxJS
If you hover your mouse over the getMyIp method, you’ll notice that it returns an Observable.
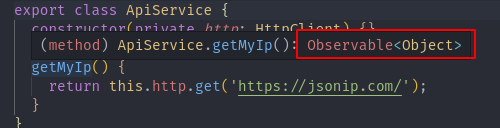
If you’ve never worked with an Observable before, you’re probably wondering, “what the hell is that?”. An Observable is a data stream over time. You can subscribe to an observable to get the data from it. Let’s see an example from the rxjs website to make it clearer.
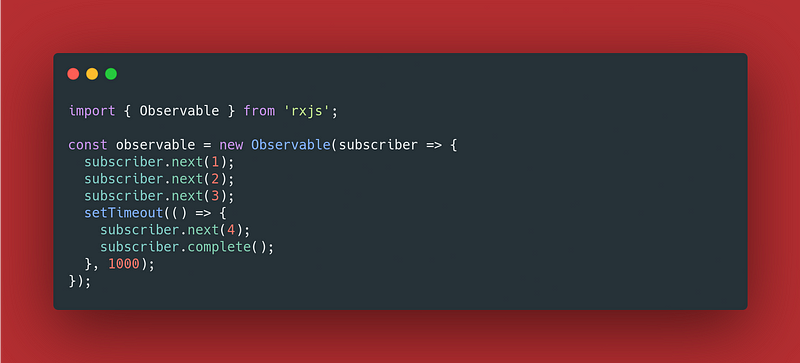
When you subscribe to this observable you will immediately get values 1, 2, and 3. Then you will get 4 about a second later, and it will all be in the same subscription.
So let’s see how that works in Angular. We’re going to use our API service in the my-route component.

Now all we’re going to do is console log the response that we get from the API. You may notice that we’re also making use of Dependency Injection here to call our ApiService. If we run the app and go to our my-route route we can open the developer tools and see that we’re console logging some data.

Ok, so how do we actually make this useful in our component? First, we’re going to make use of TypeScript and tell the http.get method the shape of the response that we’re going to get. Then we’re going to map the response to just the IP address.
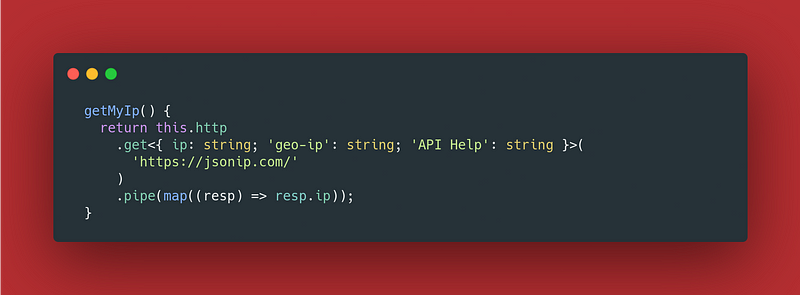
The map function is an rxjs function that transforms one object into another type. In this case, we’re turning an object into a string. Then we’re going to create a property of the class that we can use in the HTML template.
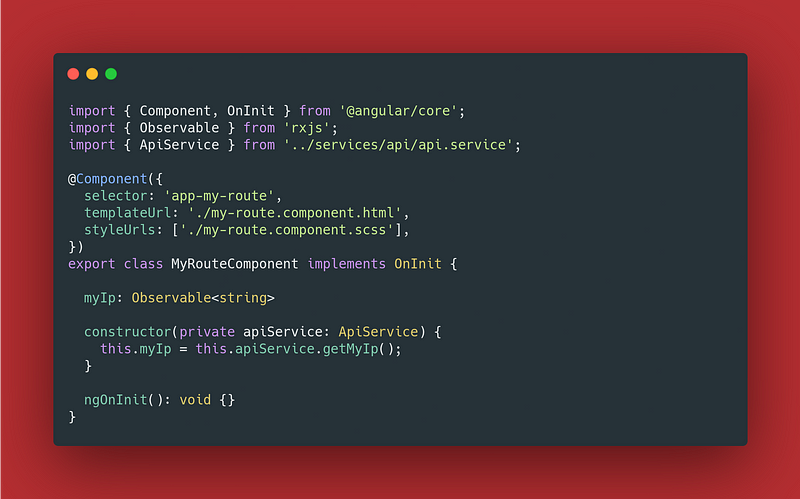
To summarize, our getMyIp method will now return an Observable of a string as opposed to an Observable of an object. We can then assign that value to a property in our class.
Angular’s two-way data binding and templating
Now we’re ready to use Angular’s two-way data binding to display the IP address in the UI. To do this is shockingly simple. Just put the following in my-route.component.html.
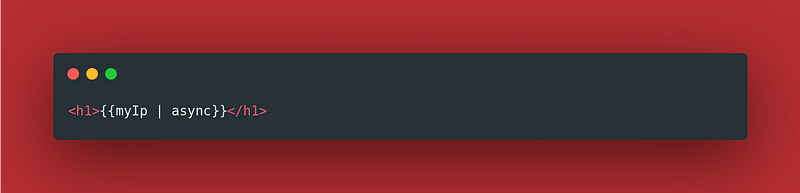
If you run that, you’ll see that your IP displays nice and big in an h1 tag on the page (I’m not going to show it because you should never reveal your IP address on the internet)! So what did we actually do here? How about we back up and take a more simple example.
For this example, we’re going to have to import FormsModule in my-route.module.ts because we’re going to use an input for this demonstration.
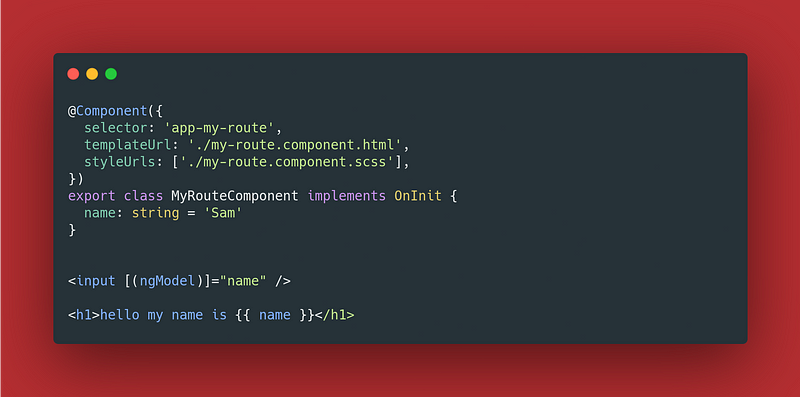
In this example, we just have a simple string that is then being inserted into the HTML. The double curly braces enable us to the Angular’s templating engine to insert values into the DOM. You may be wondering what two-way data binding even does. If you run the application and start typing in the text field, you’ll see something interesting.
As you can see, when we edit the name in the text box, it automatically updates the DOM. What’s happening is that we’re telling Angular to listen for DOM changes to the element, in this case, an input field, and set that value as the ‘name’ property of our class. This is a really simple example to illustrate what it is exactly. If you want to play around with it a bit, remove the parentheses from the ngModel so it looks like this
<input [ngModel]="name" />
Then try typing into the field again. You may notice that it doesn’t update the name anymore. The reason for that is that the square bracket binds the attribute so you will notice that the input value is still defaulted to the default value of ‘name.’ The parentheses binds the event of the input that will update the name.
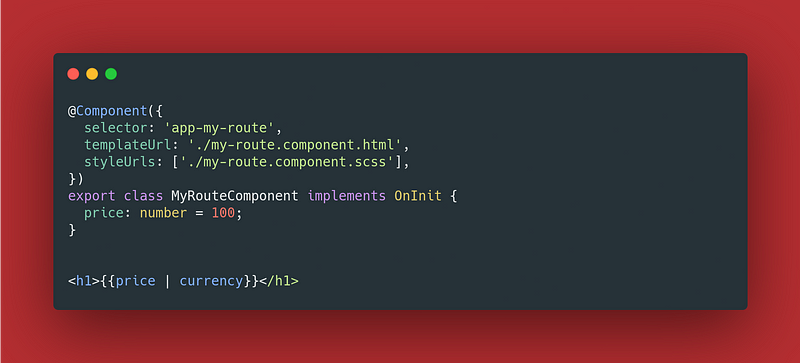
Angular Pipes
So, going back to our original example with the IP Address, we can see that we have something interesting in the template. You may have noticed that we are adding a pipe and then the word async after it.
<h1>{{myIp | async}}</h1>
This is an Angular Pipe. Angular has lots of built-in pipes; for example, there is a currency pipe.
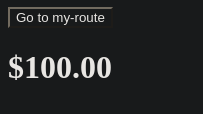
A pipe is a way of transforming some data in an Angular template. They are usually simple functions that perform a specific task. You can explore the built-in pipes here. You can also create custom pipes if you want.
So why did we use the async pipe here? An observable is another way of gathering data asynchronously, like a promise. In fact, we can use the firstValueFrom method of RxJS to change our Obserbale to a Promise.
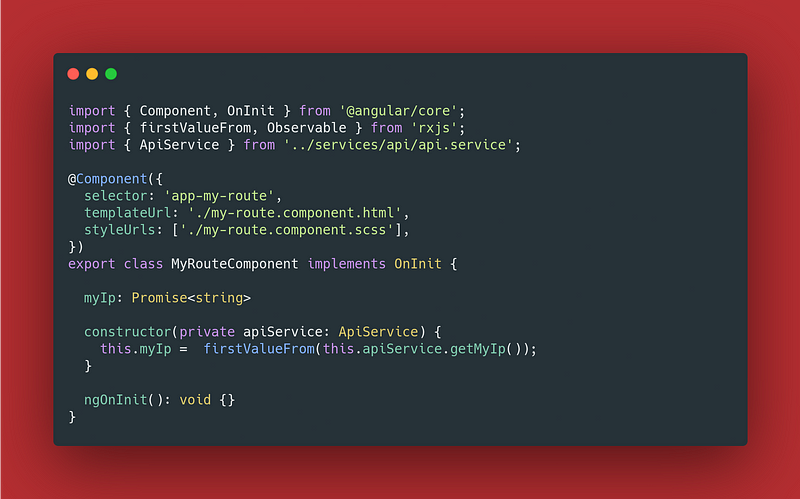
Even though we have changed this to a promise, you’ll notice that it works the exact same way. That’s because the async pipe gets the first response from the output of any async data. The cool thing about the async pipe is that it will subscribe to an observable, so any data that changes over time will be displayed right away, just like in our two-way data binding demo. The async pipe is also automatically unsubscribed from an observable when a component is destroyed.
One of the drawbacks of using Observables are long-running listeners. Let’s go back and look at what we originally did with the getMyIp method.
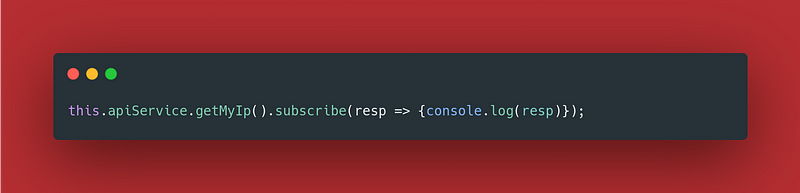
When we subscribed to this component, this listener might not get destroyed once we navigate away. If you do this a lot in a large application, this could cause memory leaks and make your app lag. That’s why if you’re using this data to display in the UI, you’re better off using the async pipe instead of creating a new subscription.
Wrapping it up
Hopefully, you’ve found some of this information useful! This hasn’t been a completely comprehensive guide but it should be enough to pique your curiosity. This should be enough for you to be able to go out and start making Angular applications. If you have questions about Angular leave them in a comment and I’ll do my best to address those questions in future articles.
If you’ve enjoyed this article I’d love for you to join my mailing list where I send out additional tips & tricks!
If you found this article helpful, interesting, or entertaining buy me a coffee to help me continue to put out content!