
Angular and Firebase — The Perfect Pair: Part 3

Last time we talked about setting up the Firebase CLI and starting out with some Firestore rules. If you missed that part you can catch up on it here. In this article, we’re going to create an Angular app for our Notes App and integrate the necessary Firebase SDKs into it.
The Angular CLI
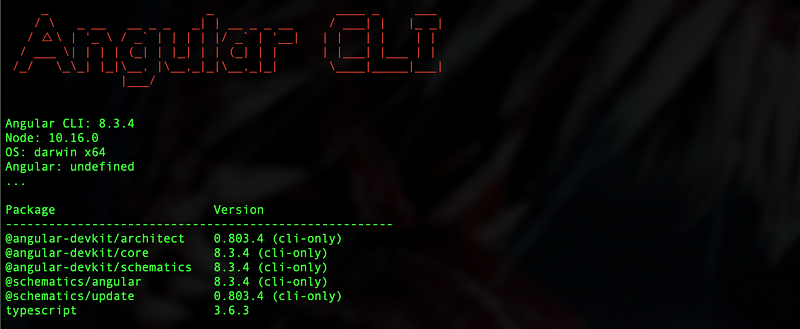
Before we can start an Angular app we need the Angular CLI. If you already have it installed then you can skip to the next section. If you still need to install the CLI you can do so by running the commandnpm install -g @angular/cli and wait a couple of seconds for that to install. Once that is done you should be able to run ng version and get something similar to the screen above. At the time of writing what you see in the image above is the latest version available.
The Angular App
Now let’s get into creating this app. The CLI that comes with Angular is extremely powerful and allows you to start an app with a single simple command ng new FirebaseNoteApp and with that, it will create all of the boilerplate code and get you to a point where you can run it right away.
I want to make it clear that this is not a full Angular tutorial, this will be a very down and dirty Angular introduction. If you aren’t familiar with Angular there are some fantastic Angular courses on YouTube and all over the web to get you caught up. While you don’t need any working knowledge of Angular for this course, it will definitely help.
Once you run the ng new command you’ll get the following prompt asking you about integrating Angular routing.

I always initialize Angular routing because this gives us the ability to lazy-load modules. While it’s entirely possible to integrate routing later, it’s just easier to do it now. When I say lazy-loaded it means that the whole app won’t get loaded into the user’s browser right away. It will only load the parts that the user is currently requesting, which helps your app load faster.
Then next prompt asks you which kind of styles sheets you want to use.

I usually use SCSS, I don’t really have a good reason as to why I, personally, always choose this, but you can find tons of articles telling you the benefits of sass over regular CSS, which I won’t be getting into. Once you make your final choice it will go ahead and create the rest of the app. Once the command is finished we can open up the app in VS Code so we can start working on it.
Adding the initial routes
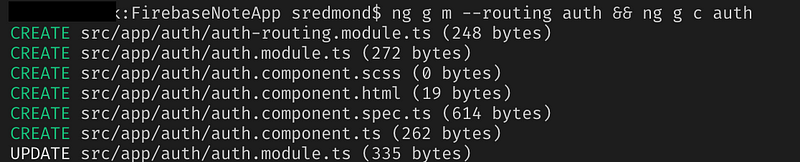
So right away we know that we are going to need a sign-in page, sign up page, a home page to display the notes. I like to have my pages surrounding authentication under one module I’ll call auth. So first we’re going to create a lazy-loaded auth module by running the command ng g m --routing auth && ng g c auth which will create a new module named auth and a component under the module.
What we did here is we generated a new module and component named auth. The Angular CLI is smart enough to know that the component is going to need to be imported in the auth module, which is why you always create the module first, so the CLI will automatically do that for you. Now we’re going to need 2 more modules that will be loaded inside the auth route for sign-in and sign up. We’re going to run similar commands, just with an updated path.
ng g m --routing auth/sign-in && ng g c auth/sign-in
ng g m --routing auth/sign-up && ng g c auth/sign-up
We also know we’re going to need a home page. However, we may decide later on that we need more than just a home page so we’ll have to plan for that. We’re going to set it up similarly to how we did auth/sign-in and auth/sign-up. So we need a parent module first and we’ll call it main.
ng g m --routing main && ng g c main
ng g m --routing main/notes && ng g c main/notes
I figured we’d just call the home page notes since that’s what the whole app is about. There is one more module we’re going to need and that is for 404 errors. Angular’s routing has some awesome flexibility and is super easy to set up, but we’ll get to that in the next section. Right now we just need to create one last route:
ng g m --routing not-found && ng g c not-found
This will give us a page to redirect a user to if they happen upon a route that doesn’t exist.
Configuring routing
Now we have to get routing to actually work. This is super easy, but it can be quite tedious. If we go into auth-routing.module.ts we’ll see this:
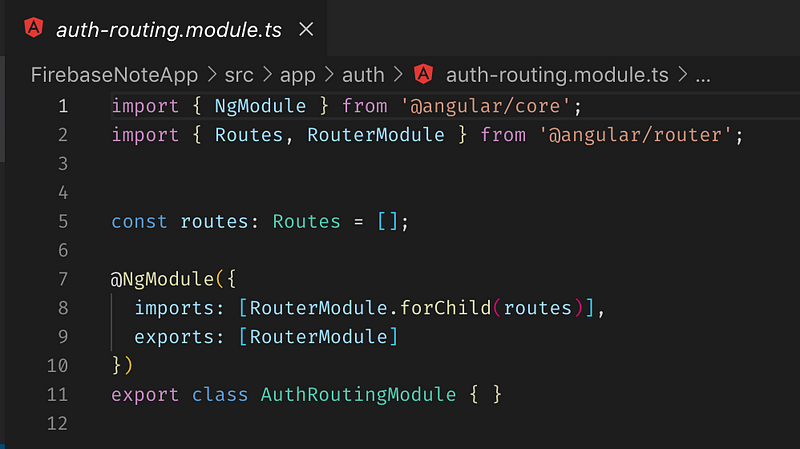
Now, this is mostly set up for us, but it’s missing the actual route information. In the routes array, we have to add the auth route.

We will have to do this for EVERY route that we have created, which is why I say this can get tedious. We have to import each module’s component and assign the base path as an empty string. The empty string tells Angular that this is the default route that Angular router will always try to get when you specify that path. For example if we were to try to go to http://localhost:4200/auth it would try to load the AuthComponent. You can check the GitHub repo to see how it is all set up.
Once you have done that for every route, we will have to specify the children of our auth and main parent components. If we go back to auth.routing-module.ts we can add another argument called children to the Route object. It should look like this:
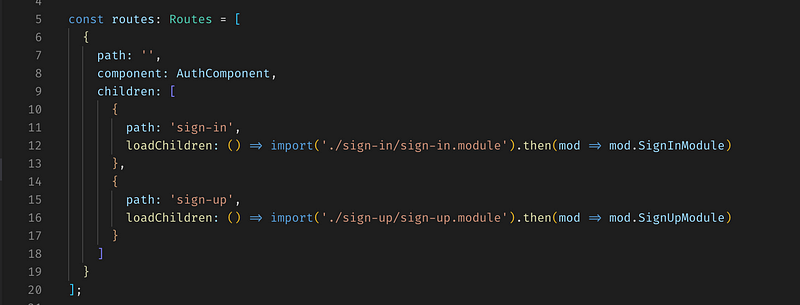
You’ll notice that instead of using a component to specify the sign-in and sign up routes we used the loadChildren() method. When we specify the component in the sign-in.routing-module.ts we don’t actually have to use it in the parent route. Like I mentioned, the benefit of lazy-loading is that whatever logic is contained in the child route doesn’t actually get loaded until that route is hit, making the app usable a whole lot faster. We have to do the same thing for the main module as well.
Once we have all our routers configured, the last thing we have to do is set up the app routes in app-routing.module.ts which will point to our other routes. Here is what it looks like:
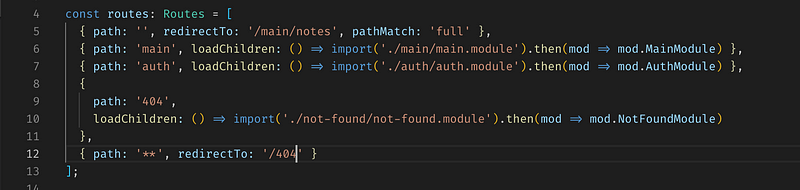
Right away you’ll notice that this is a little different from the other routes. Let’s start with the first route, this will be our main route for the whole app. You can guess that the Angular router is going to try to automatically redirect the user to the /main/notes route so the user can see their notes. Now you can obviously tell there may be a small issue here because what if the user isn’t authenticated? We’ll address that later when we talk about router guards. The other routes are just being rendered like child routes. The last route is the other big difference. Rather than an empty string we have '**' which is a wild-card route. This will catch all routes that are not specified, essentially giving us a way to catch 404 errors.
Configure the DOM
Our routes are now fully operational, but won’t be displayed yet. If we run the app we’ll get the above screen. This is not really what we expected, but it’s easy to fix.
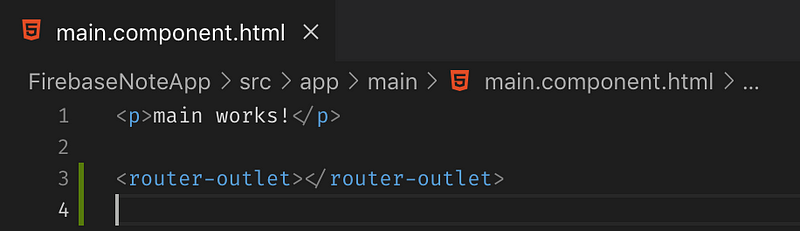
If you go into app.component.html you’ll see a bunch of boilerplate code that generates the above screen. You can remove all that and just have the <router-outlet></router-outlet> in the app.component.html page. This will ensure that your app is being rendered inside that router-outlet placeholder. We will also be using the router-outlet in the main and auth components as well.
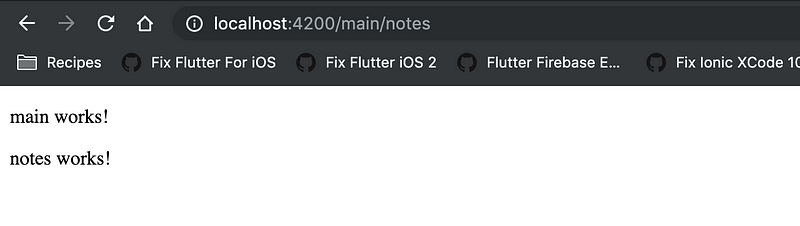
We’ll do this for the auth.component.html and this will work for now, but we’ll style it later. Now our routes will display properly.
Integrating Angular Fire
Now we’ll actually get to integrate Firebase into our app. First, we have to install the appropriate packages for the Firebase SDK.
npm i -s @angular/fire firebase
Once these two packages are installed we need to integrate it into the main module. Before we can do that we need to create a new app for our Firebase project in the Firebase console. This is pretty easy, all we have to do is go to the project dashboard and select the web app button.

Then we’re going to enter the nickname.
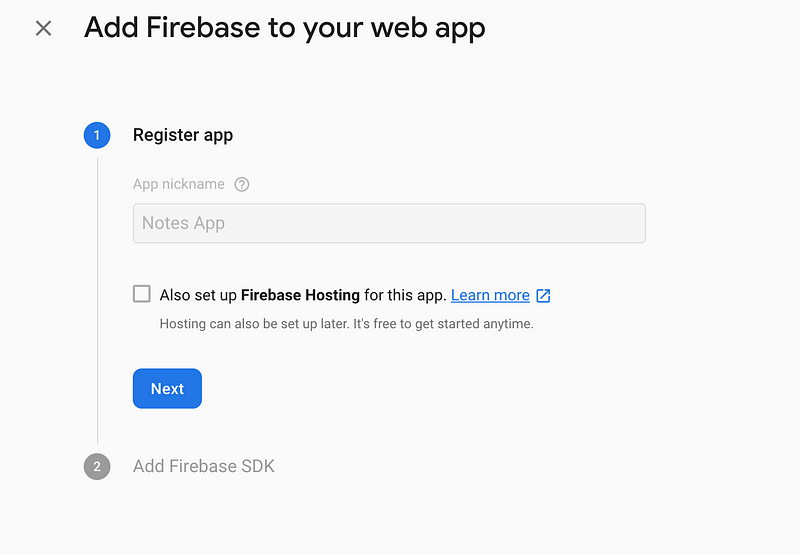
Finally, we’re going to register the app and we’ll get the SDK options.
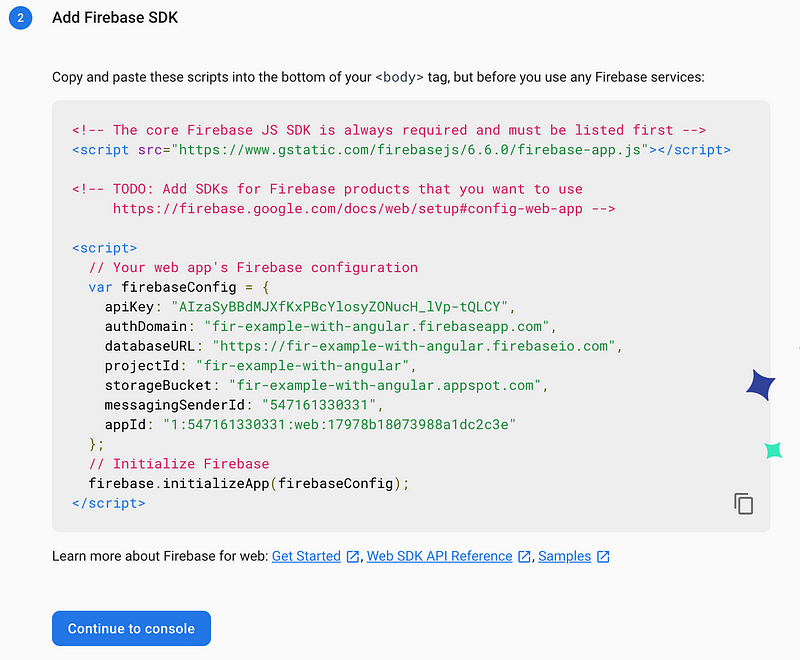
You may be a little worried that I’ve displayed API keys and so forth here, but don’t worry too much because this is all going in the Angular app. Furthermore, you don’t really have any access to do anything with this other than what we’re going to allow in the app because of all the rules and so forth that we’ve set, so don’t worry.
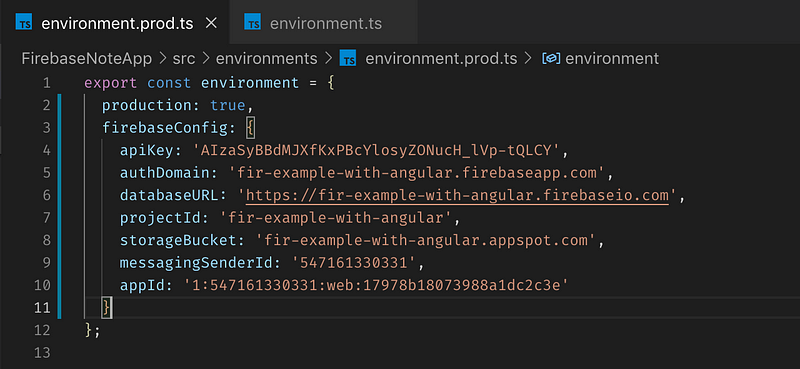
The next thing we have to do is copy/paste the firebaseConfig into both environment.ts and environment.prod.ts files.
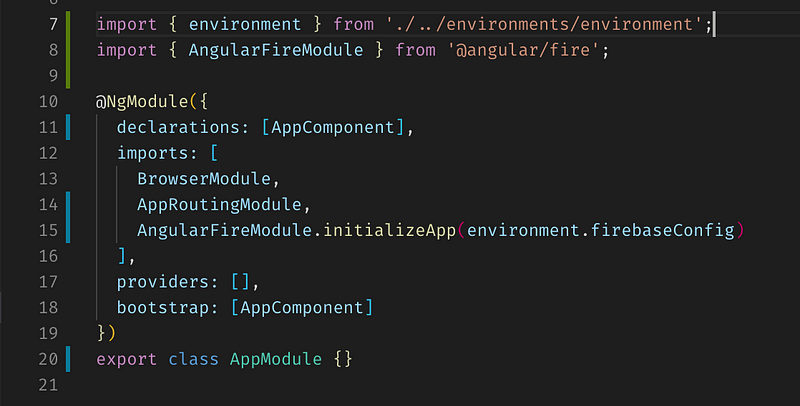
Now we’re ready to initialize the Firebase SDK in the app.module.ts file. The first thing we have to do is import the environment and the AngularFireModule into the app module and then initialize the AngularFireModule.
Now we can import the rest of the Firebase modules we will need later on for the app.
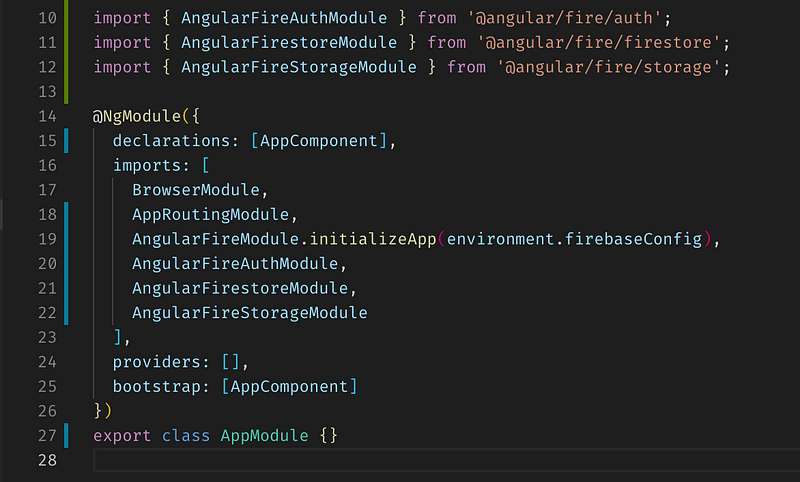
That’s it! The Firebase SDK is now fully ready for us to use.
Router Guards
A router guard is a special kind of service that we can use to secure routes based on any custom rule that we want. First, we’ll need to generate a new router guard.
ng g g services/auth/auth
This will generate a guard in the services/auth directory. If the directory doesn’t exist the Angular CLI will create it. Once you enter the command you will be presented with the following options.

I usually select CanActivate and move on. The difference between these methods is that CanActivate stops unauthorized users from entering a route, the CanActivateChild method stops unauthorized users from navigating child routes of the route it is declared on, and CanLoad stop entire lazy modules from loading for unauthenticated users. We will only need CanActivate because that will stop anyone from getting into our main module.
Next, we have to define our authentication method in the auth guard.
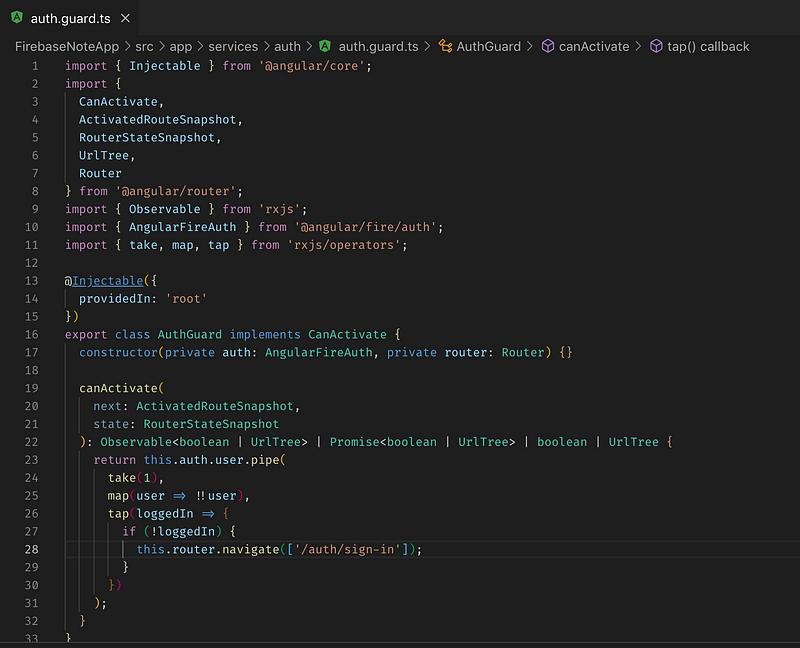
Basically what we’re doing here is getting the current user, seeing if the user is null or not, and then if they are null we’re going to navigate the user to the sign-in page. The default behavior, if this were to fail, would be to do absolutely nothing, which would probably cause a user to think there is a problem with the app itself. Having it navigate away is not entirely necessary, but it helps guide the user to figure out why they can’t get into the app.
Next, we’re going to export all the services using an index file in the services/ directory.
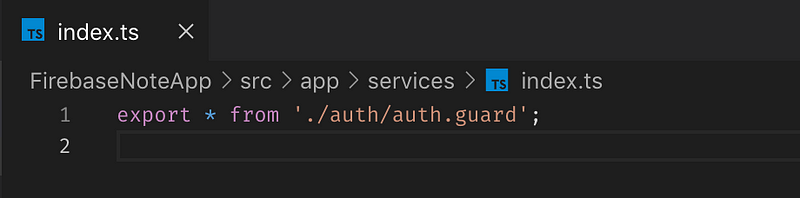
This is so we can import services more easily in our app. We’re going to do just that in the app-routing.module.ts and add the router guard to the main route.
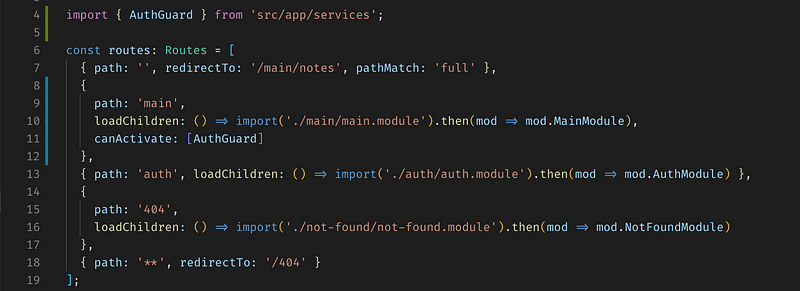
What I’ve done is added the canActivate parameter to the main route which means that before anyone can see the main/notes route they have to be signed in. Now when we try to load the main/notes route we get blocked by the AuthGuard.
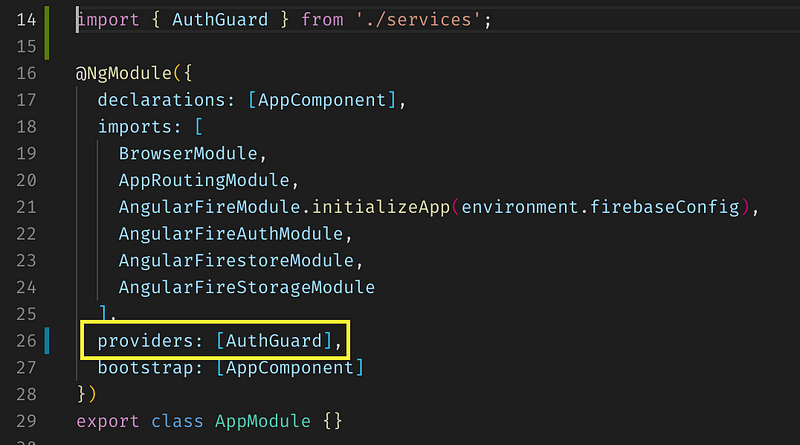
The last thing we have to do is put this auth guard in the Providers array in the main app.module.ts file.
Auth Service
The last thing we’re going to set up in this article is the auth service. First, we’re going to generate the new service and define some methods that we know we’re going to need.
ng g s services/auth/auth
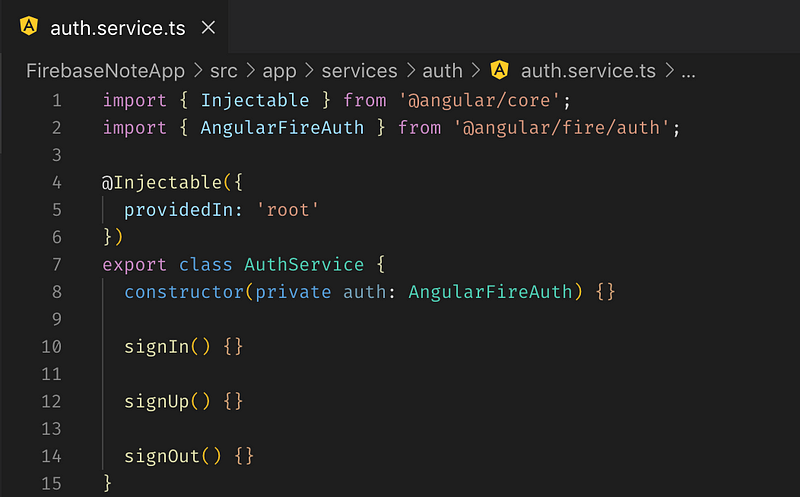
We’ve just set up a pretty blank auth service with some basic methods. We’re only going to expand these methods a little bit in this article to get some basic working functionality.
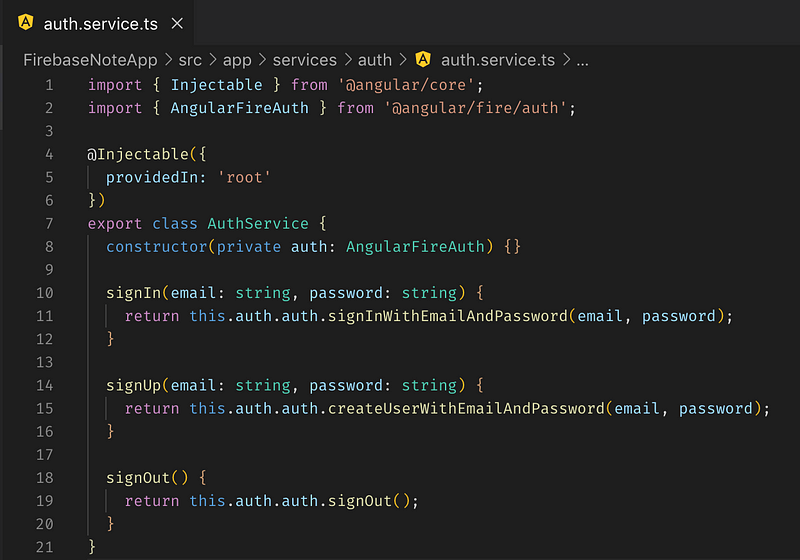
As you can see, we’ve imported the AngularFireAuth library and used Angular’s dependency injection to put it in the constructor of the AuthService. Then we can use the built-in methods to authenticate, create, and sign out users in our app.
Don’t forget we have to add this new service to the same providers array in the app module, and then we’re done!
EDIT
Technically you don’t have to add your services into the providers array anymore. Since the Injectable decorator specifies the service be provided at the root level it will be available throughout the app by default. However, there are certain situations that require you include your services in the providers array.
Lastly
I’m going to keep this brief and end the article here. We’ve covered creating and setting up the Angular CLI, lazy-loaded modules, and setting up services with the Firebase SDK integrated. In the next article, we’re going to model the data we’re going to store in Firestore as well as expand these services.
If you need to see the code examples you can see them on the GitHub repository here.
Read part 4 here.
If you’ve enjoyed this article I’d love for you to join my mailing list where I send out additional tips & tricks!
If you found this article helpful, interesting, or entertaining buy me a coffee to help me continue to put out content!