
Angular and Firebase — The Perfect Pair: Part 4
Last time we set up our front-end with some basic routing and services, but it’s kind of hard to do anything when we don’t know what our data is supposed to look like. If you need to catch up you can find the previous part here. I talked about some fields our documents might have when we set up Firestore rules, but in this article, we’re going to create all the model definitions we’re going to need for our app so that we always know what kind of data we’re working with.
I want to note that this is not entirely necessary, but it helps keep your data consistent throughout the project, as well as ensure that your app always knows what kind of data to expect.
In this article, we’re going to create an NPM library containing our custom models as well as integrate them into our Angular app with the services we’re going to need to make our app work.
TypeScript

I’m a MASSIVE fan of TypeScript so I generally try to use it whenever I get the chance. That being said, I’m going to start my library with TypeScript! I won’t get too in-depth with TypeScript if you want to learn more read the docs here. We’ve seen TypeScript a little when we started out Angular app. However, TypeScript is completely separate from Angular and can be used on its own. TypeScript brings a lot of Object-Oriented Programming principles to the world of JavaScript as well as a strong type system. This will help us out a lot in the future because we will be able to expect certain types from
The Initial Model
First I’m going to create a new folder for my type models. I would like to mention that I would generally have all of these various parts (types, web app, etc.) in different repositories, but just so that it’s easier for everyone to see I’m including everything in the same repository. That way if anyone wants to check out the app, they only have to clone a single repo as opposed to a bunch of them.
So I already have a solid idea about what data I need to model: users, notes, and notifications. Before we do that, there are a few fields that I know all models are going to have: and Id and a CreatedOn timestamp. So we can actually create a general IModel that we will extend in all our other models.

User Model
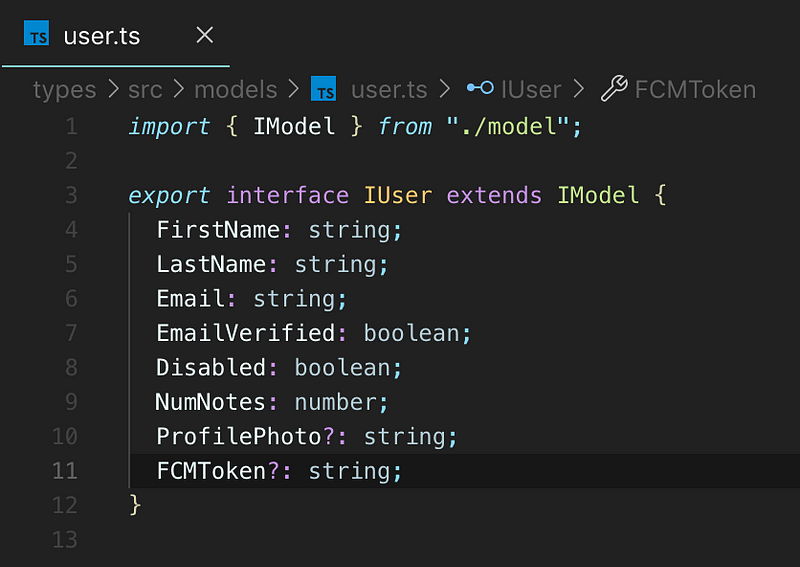
When we extend IModel we automatically give IUser all the fields of IModel. There are a lot of fields in here that we’re going to use in conjunction with Firebase Auth. Specifically: Email, EmailVerified, Disabled, FirstName, and ProfilePhoto. I’ll show you how all that syncs up once we get into Firebase Functions, but let’s continue.
Note Model
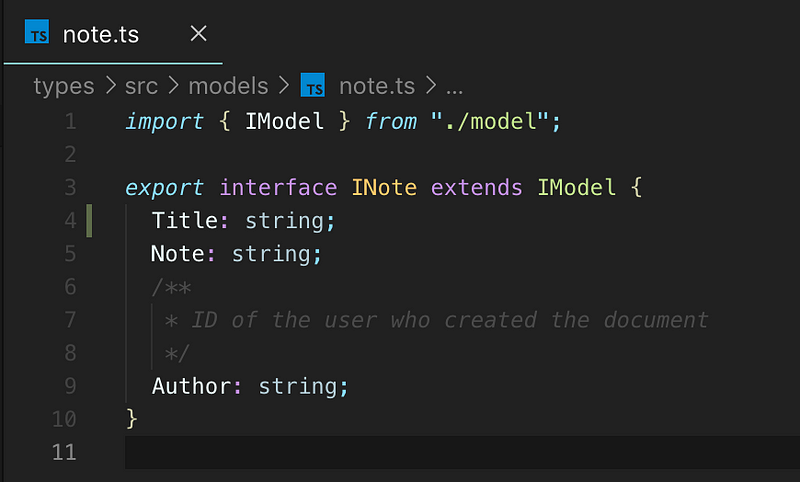
We’re probably going to amend this later, but for now, these are the only fields we’re going to need to get started.
Notification Model

This is the last model we’re going to need and it just gives us a simple notification to use. We’re going to use this in conjunction with Firebase Cloud Messaging and we’ll also cover that when we get to Firebase Functions.
Deploying the Models
Now we actually have to use the models somehow. In the project, I have included a file called deploy.js which is a simple script that is responsible for building the library, incrementing the version number, and deploying an NPM library. Feel free to check it out in the repository. The only thing you’re going to need in order to use it is to install the await-spawn package, and you’re all set to go. You can either run node deploy.js or add that as a script in your package.json and then run npm run <MY CUSTOM SCRIPT> to build and deploy a version. You can check out the NPM page here.
You may be wondering why we couldn’t just define all the services directly in the Angular app. Later on, we’re going to integrate Firebase Functions which will also need these model definitions. If we just create the models in each project then we’re going to manage the same models in 2 different places. This way gives us more flexibility to integrate these models in n number of applications/services while only having to manage them in a single place.
Using the Models
Now that we’ve deployed our models to NPM we can simply install them in any project by running npm i firebasenoteapptypes and we’re good to go!
Integrating models into the Auth Service
Now that we know exactly what type of data we’re going to use we can start to amend our services to reflect that. We’re going to start by working on the Auth Service’s sign-up method.
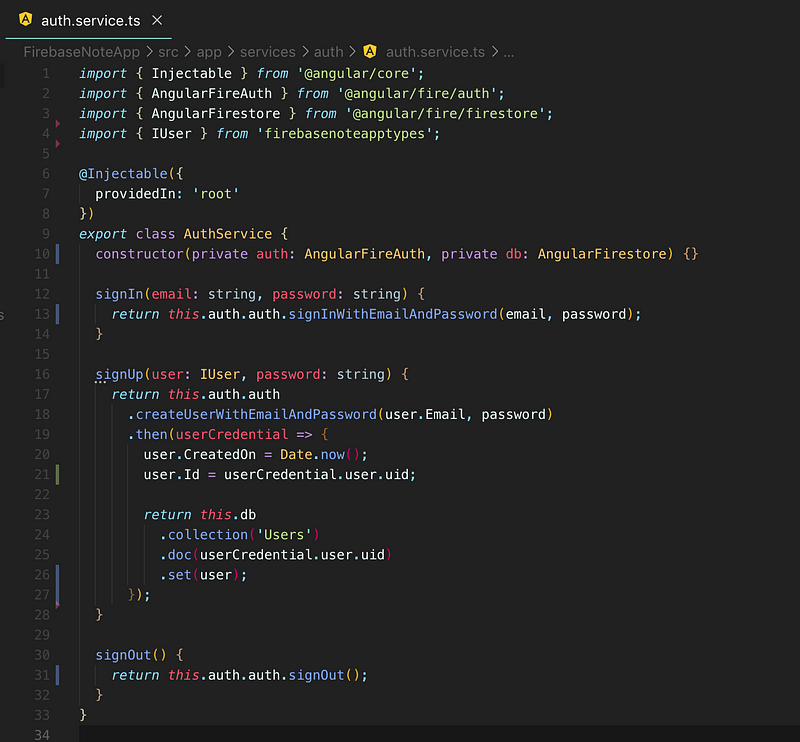
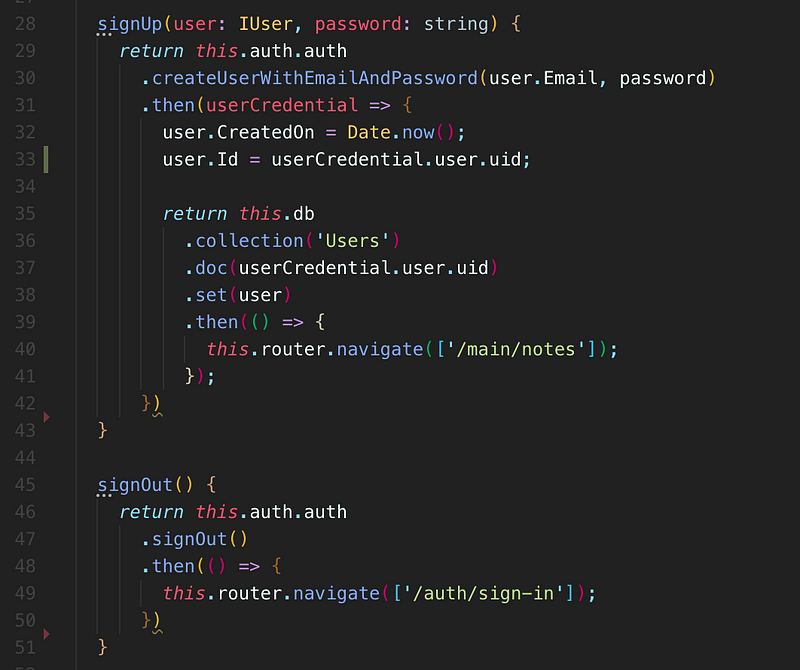
What I’ve done is import AngularFirestore as well as IUser from our custom library. Then we’re going to grab the userCredential from the createUserWithEmailAndPassword function, give it a number timestamp of now and then create a new document and we’ll also use that to set the Id of the new user.
You may notice that rather than using thecollection.add(...) method we’re using the .set method on a document. If you remember, we talked about having the ID of the document be the same as the ID from Firebase Auth. Well, this is how we achieve that. We’re going to use this method of creating documents quite a lot.
We’re not quite done, as long we’re working on the auth service there are a couple of things we may want to do as well.
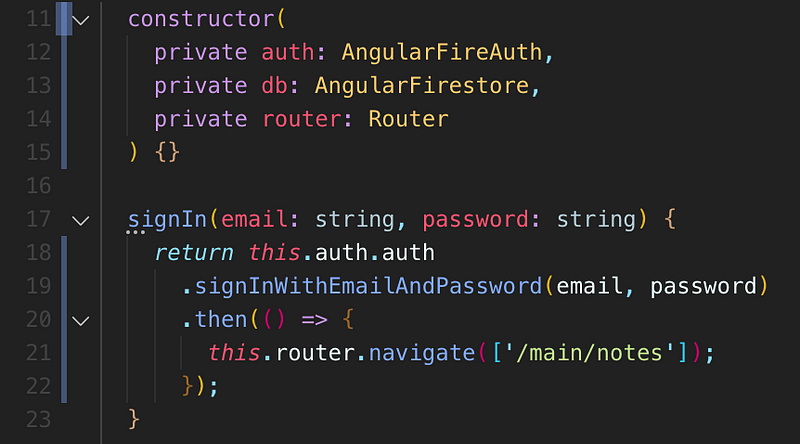
First I’m going to want to import the Angular router so that when we call the sign-in method it will also navigate the user to their notes.
We’re also going to do the same with the sign-up and sign out methods. This way we’ve got some nice self-contained methods that we can just call from anywhere in our app.
User Service
Now that we have some data models let’s create a service to handle user data. The first thing we have to do is create it in our services directory
ng g s service/user/user
Once the service has been created we can then add a little code to it.
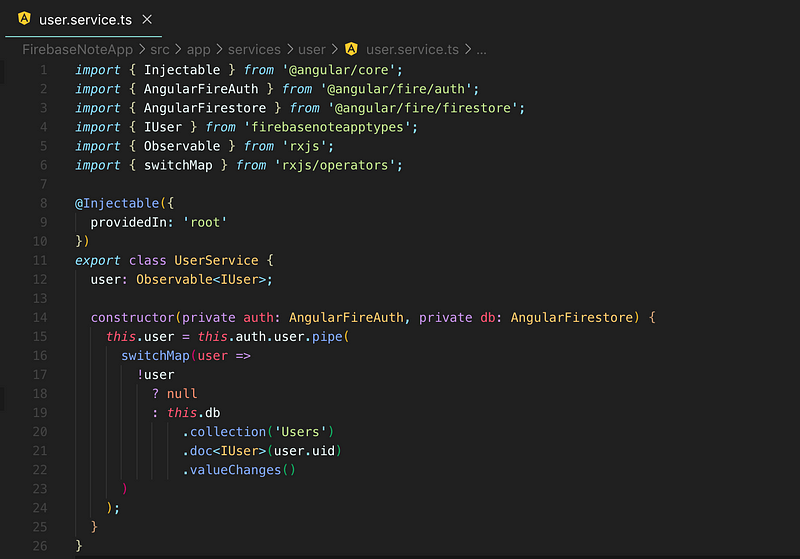
This is the first thing we’re going to want to do, is have an Observable of a user that we can subscribe to anywhere in the app. This gives us a super-easy way of grabbing the current user from Firestore.

Next, we’re going to implement an update method. Since we’re already getting a perfect IUser model from this service, we can simply send it back with some amended fields.
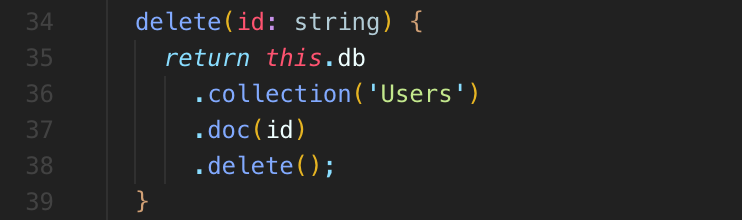
Lastly, we’re going to need a way to delete a user as well.
Notes Service
Next, we need a service to deal with our notes.
ng g s services/notes/notes
This will look very similar to our user service.
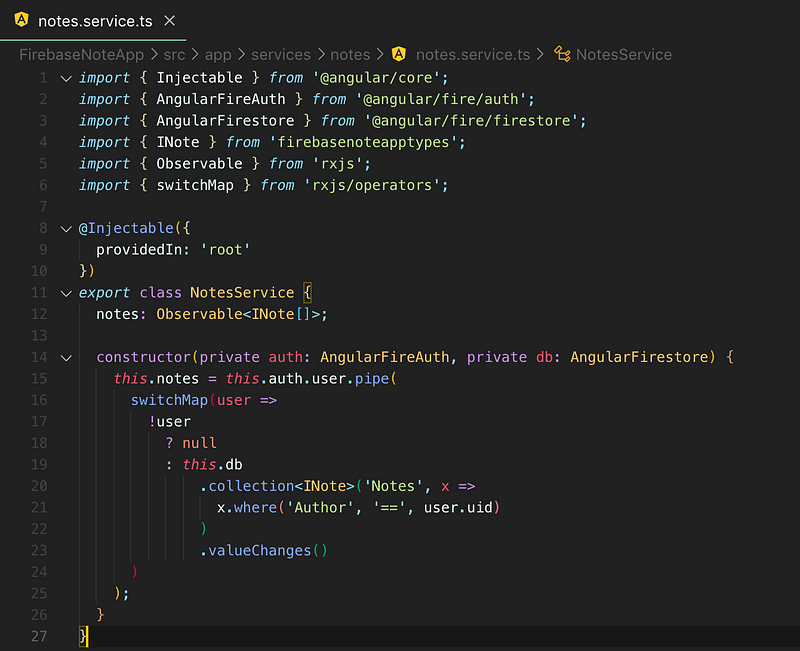
Starting out it looks pretty much the same, except for the fact that we’re returning an array of INote that we use the currently logged in user to grab.
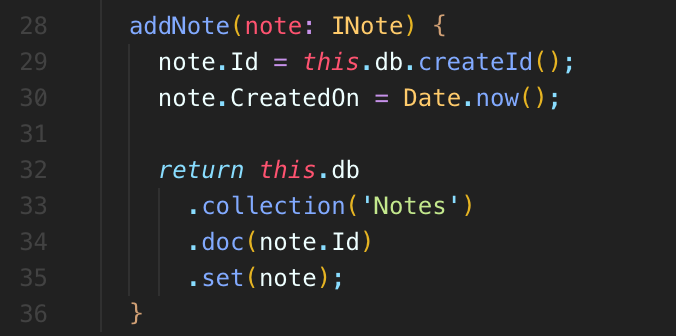
We’re also going to need a way to add a new note.
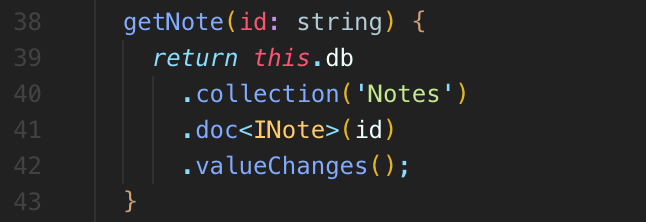
We might also need a way to return a single note from the id. This will come in handy when we create a page like /main/note/:id.
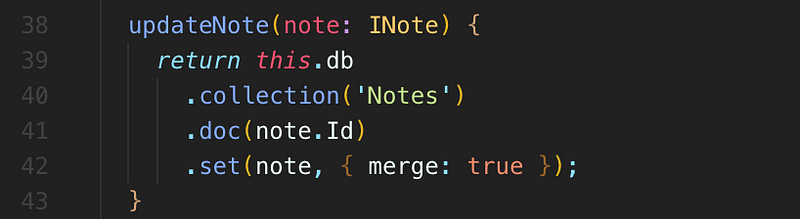
We’re going to have to be able to update a note as well.
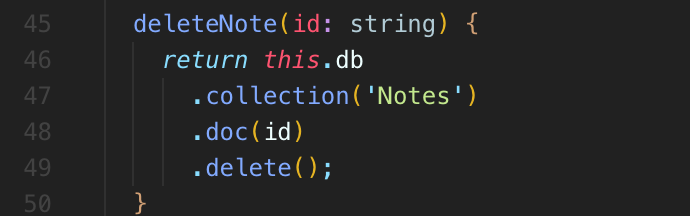
Lastly, we’re going to need to delete a note.
Firestore operates with real-time data
One thing you may have noticed is that when we update, delete, or add a new document we aren’t really doing anything to let the app know that something has happened to this data. The reason for that is when we return the initial observable that creates a real-time listener. So anytime our data changes that observable will get those changes in immediately!
This is one of the coolest features of Firestore because it really eliminates the need for a large back end. Depending on the app you may not even need any kind of back end at all. These are literally all the functions we’re going to need to interact with the Firestore database from our Angular app.
Finishing the Services
Once we’re done creating the services we need to export them from the index.ts in the services directory. Then we have to add them to the providers array in app.module.ts.
Finishing Up
In this part, we covered setting up our data model library and integrating that into the services that will make our app run. In the next article, we’re going to create a simple sign-in and sign up page so that we can get a user in the app and start playing around with Firestore a little bit.
Read part 5 here.
If you’ve enjoyed this article I’d love for you to join my mailing list where I send out additional tips & tricks!
If you found this article helpful, interesting, or entertaining buy me a coffee to help me continue to put out content!
📝 Read this story later in Journal.
👩💻 Wake up every Sunday morning to the week’s most noteworthy stories in Tech waiting in your inbox. Read the Noteworthy in Tech newsletter.